清除IDEA缓存后,删除.m2文件后依旧无法解析依赖,在setting.xml中新增镜像后解决问题

1 | <mirrors> |
清除IDEA缓存后,删除.m2文件后依旧无法解析依赖,在setting.xml中新增镜像后解决问题
1 | <mirrors> |
Connection to node -1 could not be established. Broker may not be available.
卡夫卡配置文件中监听地址存在问题,未设置IP
配置文件异常 例如:
1 | spring: |
但是下方的方式可以使用
1 | spring.datasource.driver-class-name= com.mysql.cj.jdbc.Driver |
没装连接用的jar包
例子
1 |
|
未使用注释@Service,若使用serviceimp则应在impl中标注@Service
mapper.java与mapper.xml文件名应相同
1 | mapper-locations未配置正确 |
//实体类package com.sk.skkill.entity;
1 | import com.baomidou.mybatisplus.annotation.TableField; |
1 | package com.sk.skkill.controller; |
1 |
1 | import org.mybatis.spring.annotation.MapperScan; |
1 | mapper-locations: classpath*:org/jeecg/modules/**/xml/*Mapper.xml |
说明:
get 查询单行 remove 删除 list 查询集合 page 分页 前缀命名方式区分 Mapper 层避免混淆,T 为任意实体对象IBaseService 继承 Mybatis-Plus 提供的基类Wrapper 为 条件构造器1 | // 插入一条记录(选择字段,策略插入) |
| 类型 | 参数名 | 描述 |
|---|---|---|
| T | entity | 实体对象 |
| Collection |
entityList | 实体对象集合 |
| int | batchSize | 插入批次数量 |
1 | // TableId 注解存在更新记录,否插入一条记录 |
| 类型 | 参数名 | 描述 |
|---|---|---|
| T | entity | 实体对象 |
| Wrapper |
updateWrapper | 实体对象封装操作类 UpdateWrapper |
| Collection |
entityList | 实体对象集合 |
| int | batchSize | 插入批次数量 |
1 | // 根据 entity 条件,删除记录 |
| 类型 | 参数名 | 描述 |
|---|---|---|
| Wrapper |
queryWrapper | 实体包装类 QueryWrapper |
| Serializable | id | 主键ID |
| Map<String, Object> | columnMap | 表字段 map 对象 |
| Collection<? extends Serializable> | idList | 主键ID列表 |
1 | // 根据 UpdateWrapper 条件,更新记录 需要设置sqlset |
| 类型 | 参数名 | 描述 |
|---|---|---|
| Wrapper |
updateWrapper | 实体对象封装操作类 UpdateWrapper |
| T | entity | 实体对象 |
| Collection |
entityList | 实体对象集合 |
| int | batchSize | 更新批次数量 |
1 | // 根据 ID 查询 |
| 类型 | 参数名 | 描述 |
|---|---|---|
| Serializable | id | 主键ID |
| Wrapper |
queryWrapper | 实体对象封装操作类 QueryWrapper |
| boolean | throwEx | 有多个 result 是否抛出异常 |
| T | entity | 实体对象 |
| Function<? super Object, V> | mapper | 转换函数 |
1 | // 查询所有 |
| 类型 | 参数名 | 描述 |
|---|---|---|
| Wrapper |
queryWrapper | 实体对象封装操作类 QueryWrapper |
| Collection<? extends Serializable> | idList | 主键ID列表 |
| Map<?String, Object> | columnMap | 表字段 map 对象 |
| Function<? super Object, V> | mapper | 转换函数 |
1 | // 无条件分页查询 |
| 类型 | 参数名 | 描述 |
|---|---|---|
| IPage |
page | 翻页对象 |
| Wrapper |
queryWrapper | 实体对象封装操作类 QueryWrapper |
1 | // 查询总记录数 |
| 类型 | 参数名 | 描述 |
|---|---|---|
| Wrapper |
queryWrapper | 实体对象封装操作类 QueryWrapper |
1 | // 链式查询 普通 |
1 | // 链式更改 普通 |
说明:
Mybatis-Plus 启动时自动解析实体表关系映射转换为 Mybatis 内部对象注入容器T 为任意实体对象Serializable 为任意类型主键 Mybatis-Plus 不推荐使用复合主键约定每一张表都有自己的唯一 id 主键Wrapper 为 条件构造器1 | // 插入一条记录 |
| 类型 | 参数名 | 描述 |
|---|---|---|
| T | entity | 实体对象 |
1 | // 根据 entity 条件,删除记录 |
| 类型 | 参数名 | 描述 |
|---|---|---|
| Wrapper |
wrapper | 实体对象封装操作类(可以为 null) |
| Collection<? extends Serializable> | idList | 主键ID列表(不能为 null 以及 empty) |
| Serializable | id | 主键ID |
| Map<String, Object> | columnMap | 表字段 map 对象 |
1 | // 根据 whereWrapper 条件,更新记录 |
| 类型 | 参数名 | 描述 |
|---|---|---|
| T | entity | 实体对象 (set 条件值,可为 null) |
| Wrapper |
updateWrapper | 实体对象封装操作类(可以为 null,里面的 entity 用于生成 where 语句) |
1 | // 根据 ID 查询 |
| 类型 | 参数名 | 描述 |
|---|---|---|
| Serializable | id | 主键ID |
| Wrapper |
queryWrapper | 实体对象封装操作类(可以为 null) |
| Collection<? extends Serializable> | idList | 主键ID列表(不能为 null 以及 empty) |
| Map<String, Object> | columnMap | 表字段 map 对象 |
| IPage |
page | 分页查询条件(可以为 RowBounds.DEFAULT) |
说明:
选装件位于 com.baomidou.mybatisplus.extension.injector.methods 包下 需要配合Sql 注入器使用,案例(opens new window)
使用详细见源码注释(opens new window)
1 | int alwaysUpdateSomeColumnById(T entity); |
1 | int insertBatchSomeColumn(List<T> entityList); |
1 | int deleteByIdWithFill(T entity); |
说明:
boolean condition表示该条件是否加入最后生成的sql中,例如:query.like(StringUtils.isNotBlank(name), Entity::getName, name) .eq(age!=null && age >= 0, Entity::getAge, age)boolean类型的入参,默认为trueParam均为Wrapper的子类实例(均具有AbstractWrapper的所有方法)R为泛型,在普通wrapper中是String,在LambdaWrapper中是函数(例:Entity::getId,Entity为实体类,getId为字段id的getMethod)R column均表示数据库字段,当R具体类型为String时则为数据库字段名(字段名是数据库关键字的自己用转义符包裹!)!而不是实体类数据字段名!!!,另当R具体类型为SFunction时项目runtime不支持eclipse自家的编译器!!!Map和List的均以json形式表现!Map或者List为空,则不会加入最后生成的sql中!!!警告:
不支持以及不赞成在 RPC 调用中把 Wrapper 进行传输
说明:
QueryWrapper(LambdaQueryWrapper) 和 UpdateWrapper(LambdaUpdateWrapper) 的父类
用于生成 sql 的 where 条件, entity 属性也用于生成 sql 的 where 条件
注意: entity 生成的 where 条件与 使用各个 api 生成的 where 条件没有任何关联行为
1 | allEq(Map<R, V> params) |
个别参数说明:
params : key为数据库字段名,value为字段值null2IsNull : 为true则在map的value为null时调用 isNull 方法,为false时则忽略value为null的
allEq({id:1,name:"老王",age:null})—>id = 1 and name = '老王' and age is nullallEq({id:1,name:"老王",age:null}, false)—>id = 1 and name = '老王'1 | allEq(BiPredicate<R, V> filter, Map<R, V> params) |
个别参数说明:
filter : 过滤函数,是否允许字段传入比对条件中params 与 null2IsNull : 同上
allEq((k,v) -> k.indexOf("a") >= 0, {id:1,name:"老王",age:null})—>name = '老王' and age is nullallEq((k,v) -> k.indexOf("a") >= 0, {id:1,name:"老王",age:null}, false)—>name = '老王'1 | eq(R column, Object val) |
eq("name", "老王")—>name = '老王'1 | ne(R column, Object val) |
ne("name", "老王")—>name <> '老王'1 | gt(R column, Object val) |
gt("age", 18)—>age > 181 | ge(R column, Object val) |
ge("age", 18)—>age >= 181 | lt(R column, Object val) |
lt("age", 18)—>age < 181 | le(R column, Object val) |
le("age", 18)—>age <= 181 | between(R column, Object val1, Object val2) |
between("age", 18, 30)—>age between 18 and 301 | notBetween(R column, Object val1, Object val2) |
notBetween("age", 18, 30)—>age not between 18 and 301 | like(R column, Object val) |
like("name", "王")—>name like '%王%'1 | notLike(R column, Object val) |
notLike("name", "王")—>name not like '%王%'1 | likeLeft(R column, Object val) |
likeLeft("name", "王")—>name like '%王'1 | likeRight(R column, Object val) |
likeRight("name", "王")—>name like '王%'1 | isNull(R column) |
isNull("name")—>name is null1 | isNotNull(R column) |
isNotNull("name")—>name is not null1 | in(R column, Collection<?> value) |
in("age",{1,2,3})—>age in (1,2,3)1 | in(R column, Object... values) |
in("age", 1, 2, 3)—>age in (1,2,3)1 | notIn(R column, Collection<?> value) |
notIn("age",{1,2,3})—>age not in (1,2,3)1 | notIn(R column, Object... values) |
notIn("age", 1, 2, 3)—>age not in (1,2,3)1 | inSql(R column, String inValue) |
inSql("age", "1,2,3,4,5,6")—>age in (1,2,3,4,5,6)inSql("id", "select id from table where id < 3")—>id in (select id from table where id < 3)1 | notInSql(R column, String inValue) |
notInSql("age", "1,2,3,4,5,6")—>age not in (1,2,3,4,5,6)notInSql("id", "select id from table where id < 3")—>id not in (select id from table where id < 3)1 | groupBy(R... columns) |
groupBy("id", "name")—>group by id,name1 | orderByAsc(R... columns) |
orderByAsc("id", "name")—>order by id ASC,name ASC1 | orderByDesc(R... columns) |
orderByDesc("id", "name")—>order by id DESC,name DESC1 | orderBy(boolean condition, boolean isAsc, R... columns) |
orderBy(true, true, "id", "name")—>order by id ASC,name ASC1 | having(String sqlHaving, Object... params) |
having("sum(age) > 10")—>having sum(age) > 10having("sum(age) > {0}", 11)—>having sum(age) > 111 | func(Consumer<Children> consumer) |
func(i -> if(true) {i.eq("id", 1)} else {i.ne("id", 1)})1 | or() |
注意事项:
主动调用or表示紧接着下一个方法不是用and连接!(不调用or则默认为使用and连接)
eq("id",1).or().eq("name","老王")—>id = 1 or name = '老王'1 | or(Consumer<Param> consumer) |
or(i -> i.eq("name", "李白").ne("status", "活着"))—>or (name = '李白' and status <> '活着')1 | and(Consumer<Param> consumer) |
and(i -> i.eq("name", "李白").ne("status", "活着"))—>and (name = '李白' and status <> '活着')1 | nested(Consumer<Param> consumer) |
nested(i -> i.eq("name", "李白").ne("status", "活着"))—>(name = '李白' and status <> '活着')1 | apply(String applySql, Object... params) |
注意事项:
该方法可用于数据库函数 动态入参的params对应前面applySql内部的{index}部分.这样是不会有sql注入风险的,反之会有!
apply("id = 1")—>id = 1apply("date_format(dateColumn,'%Y-%m-%d') = '2008-08-08'")—>date_format(dateColumn,'%Y-%m-%d') = '2008-08-08'")apply("date_format(dateColumn,'%Y-%m-%d') = {0}", "2008-08-08")—>date_format(dateColumn,'%Y-%m-%d') = '2008-08-08'")1 | last(String lastSql) |
注意事项:
只能调用一次,多次调用以最后一次为准 有sql注入的风险,请谨慎使用
last("limit 1")1 | exists(String existsSql) |
exists("select id from table where age = 1")—>exists (select id from table where age = 1)1 | notExists(String notExistsSql) |
notExists("select id from table where age = 1")—>not exists (select id from table where age = 1)说明:
继承自 AbstractWrapper ,自身的内部属性 entity 也用于生成 where 条件
及 LambdaQueryWrapper, 可以通过 new QueryWrapper().lambda() 方法获取
1 | select(String... sqlSelect) |
说明:
以上方法分为两类.
第二类方法为:过滤查询字段(主键除外),入参不包含 class 的调用前需要wrapper内的entity属性有值! 这两类方法重复调用以最后一次为准
select("id", "name", "age")select(i -> i.getProperty().startsWith("test"))说明:
继承自 AbstractWrapper ,自身的内部属性 entity 也用于生成 where 条件
及 LambdaUpdateWrapper, 可以通过 new UpdateWrapper().lambda() 方法获取!
1 | set(String column, Object val) |
set("name", "老李头")set("name", "")—>数据库字段值变为空字符串set("name", null)—>数据库字段值变为null1 | setSql(String sql) |
setSql("name = '老李头'")LambdaWrapperQueryWrapper中是获取LambdaQueryWrapperUpdateWrapper中是获取LambdaUpdateWrapper注意事项:
需要mybatis-plus版本 >= 3.0.7 param 参数名要么叫ew,要么加上注解@Param(Constants.WRAPPER) 使用${ew.customSqlSegment} 不支持 Wrapper 内的entity生成where语句
1 |
|
1 | List<MysqlData> getAll(Wrapper ew); |
kotlin 可以使用
QueryWrapper和UpdateWrapper但无法使用LambdaQueryWrapper和LambdaUpdateWrapper
如果想使用 lambda 方式的 wrapper 请使用KtQueryWrapper和KtUpdateWrapper
1 | // 区分: |
[TOC]
为了提升UNICS系统的性能与兼容性,采用高级语言对其进行重构,并确定该操作系统名称为UNIX,这就是最早的 UNIX 操作系统(相对于 Multics ,UNIX 具有单一的意思)
GNU通用公共许可协议(GNU GPL)是一个广泛被使用的自由软件许可协议条款,最初由Stallman为GNU计划而撰写,GPL授予程序接受人以下权利,或称“自由”:
⚫ 以任何目的运行此程序的自由;
⚫ 再发行复制件的自由;
⚫ 改进此程序,并公开发布改进的自由
Linux是一个类Unix(Unix-like)的操作系统,在1991年发行了它的第一个版本
1991年11月,芬兰赫尔辛基大学的学生 Linus Torvalds写了个小程序,取名为Linux,放在互联网上。
1993,在一批高水平黑客的参与下,诞生了Linux 1.0 版
1994年,Linux 的第一个商业发行版 Slackware 问世
1996年,美国国家标准技术局的计算机系统实验室确认 Linux 版本 1.2.13(由 Open Linux 公司打包)符合 POSIX 标准

Linux内核采用的是双树系统
一棵是稳定树,主要用于发行
另一棵是非稳定树或称为开发树,用于产品开发和改进
Linux内核版本号由3位数字组成

输入模式:输入字符为命令,可进行删除、修改、存盘等操作 。
命令模式:输入字符作为文本内容。
末行模式:命令模式下输入“:/?”三个中任意一个,可移到屏幕最底一行。

(1)命令模式
输入模式下,按ESC可切换到命令模式,常用命令:
| :q! | 离开vi,并放弃刚在缓冲区内编辑的内容 |
|---|---|
| :wq | 将缓冲区内的资料写入磁盘中,并离开vi |
| :ZZ | 同wq |
| :x | 同wq |
| :w | 将缓冲区内的资料写入磁盘中,但并不离开vi |
| :q | 离开vi,若文件被修改过,则要被要求确认是否放弃修改的内容,此指令可与:w配合使用 |
(2)输入模式
输入以下命令即可进入vi输入模式
| a(append) | 在光标之后加入资料 |
|---|---|
| A | 在该行之末加入资料 |
| i(insert) | 在光标之前加入资料 |
| I | 在该行之首加入资料 |
| o(open) | 新增一行于该行之下,供输入资料用 |
| O | 新增一行于该行之上,供输入资料用 |
| dd | 删除当前光标所在行 |
| x | 删除当前光标字符 |
| X | 删除当前光标之前字符 |
| U | 撤消 |
| F | 查找 |
| ESC | 离开输入模式 |
(1)复制粘贴
| yw | 将光标所在之处到字尾的字符复制到缓冲区 |
|---|---|
| yy | 复制光标所在行到缓冲区 |
| #yy | 如:6yy表示拷贝从光标所在行往下数6行文字 |
| p | 将缓冲区内的字符贴到光标所在位置 |
(2)查找/替换
| ?字符串 | 从当前光标位置开始向后查找字符串 |
|---|---|
| /字符串 | 从当前光标位置开始向前查找字符串 |
| n | 继续上一次查找 |
| Shift+n | 以相反的方向继续上一次查找 |
(3)环境设置
| :set ai | 自动缩进,每一行开头都与上一行的开头对齐 |
|---|---|
| :set nu | 编辑时显示行号 |
| :set dir=./ | 将交换文件.swp保存在当前目录 |
| :set sw=4 | 设置缩进的字符数为4 |
| :syntax on 或者 :syntax=on | 开启语法着色 |
GCC是一个强大的工具集合,它包含了预处理器、编译器、汇编器、链接器等组件。它会在需要的时候调用其他组件。
输入文件的类型和传递给gcc的参数决定了gcc调用具体的哪些组件。
GCC 参数选项
Usage:
gcc [options] [filename]
Basic options:
| -E: | 只对源程序进行预处理(调用cpp预处理器) |
|---|---|
| -S: | 只对源程序进行预处理、编译 |
| -c: | 执行预处理、编译、汇编而不链接 |
| -o: | output_file: 指定输出文件名 |
| -g: | 产生调试工具必需的符号信息 |
| -O/On: | 在程序编译、链接过程中进行优化处理 |
| -Wall: | 显示所有的警告信息 |
| -I dir: | 在头文件的搜索路径中添加dir目录 |
| -L dir : | 在库文件的搜索路径列表中添加dir目录 |
1、预处理
2、编译成汇编代码
3、汇编成目标代码
4、链接
预处理:使用-E参数
gcc –E –o gcctest.i gcctest.c
使用wc命令比较预处理后的文件与源文件,可以看到两个文件的差异

预处理文件—->汇编代码
使用-S说明生成汇编代码后停止工作
gcc –S –o gcctest.s gcctest.i
直接编译到汇编代码
gcc –S gcctest.c


汇编代码à目标代码
gcc –x assembler –c gcctest.s
直接编译成目标代码
gcc –c gcctest.c
使用汇编器生成目标代码
as –o gcctest.o gcctest.s

目标代码à执行代码
gcc –o gcctest gcctest.o
直接生成执行代码
gcc –o gcctest gcctest.c

优化编译选项有:
-O0
缺省情况,不优化
-O1
-O2
-O3
等等


头文件和gcc不在同一目录下,用 –I dir指明头文件所在的目录。
#include <>:在默认路径“/usr/include”中搜索头文件
#include “”:在本目录中搜索


解决办法:
gcc opt.c –o opt –I ./
修改main
1 |
函数库:公用函数定义为函数库,供其他程序使用。函数库分为静态库和动态库。
静态库:程序编译时会链接到目标代码中,程序运行时不再需要静态库。程序生成的可执行程序比较大。后缀名为“.a”
动态库:程序编译时不会链接到目标代码,在程序运行时载入,运行时需要动态库存在。动态库可方便多个程序共享一个函数库。后缀名为”.so”
函数库的生成:由编译过的.o文件生成。
1.将需要生成函数库的函数执行gcc –c,生成.o文件
gcc –c hello.c
2.由.o文件创建静态库,静态库命名格式为:lib静态库名.a
ar -rv libmyhello.a hello.o
使用静态库:在调用静态库的程序编译时指定静态库名
$gcc –o hello main.c –L. –lmyhello
$./hello
1.由.o文件生成动态库,动态库的命名:lib动态库名.so
1 | gcc –shared –fPIC –o libmyhello.so hello.o |
2.使用动态库:用gcc命令指定动态库名进行编译,编译之前需将动态库文件复制到系统默认库函数目录/usr/lib中或者设置搜索路径。 sudo ldconfig
1 | gcc –o hello main.c –L. –lmyhello |

$gdb filename
gdb将装入名为filename的可执行文件。
在编译时需要使用-g选项


file :装入想要调试的可执行文件
kill:终止正在调试的程序
list:列出正在执行的程序清单
next:执行一行代码但不进入函数内部
step:执行一行代码并进入函数内部
run: 执行当前正在调试的程序
quit:终止gdb调试
break:设置断点 (break 行号)
watch:设置观察点,观察表达式的值是否发
生变化
info: 查看断点信息
info breakpoints、info watchpoints
info break 显示当前断点清单,包括到达
断点处的次数等。
info files 显示被调试文件的详细信息。
info func 显示所有的函数名称。
info local 显示当函数中的局部变量信息。
info prog 显示被调试程序的执行状态。
info var 显示所有的全局和静态变量名称
delete: 删除某个或所有的断点
delete 断点号 或 delete
disable: 使断点失效(但仍存在)
enable: 使断点有效
clear: 清除断点信息
clear 断点所在行号
clear 函数入口
continue: 继续执行程序直到程序结束
Make的引入:
Ø文件数量太大,手工gcc编译不方便
Ø仅需要编译已经做了修改的源代码文件;其他文件只需要重新连接
Ø记录哪些文件已改变且需要编译,哪些文件仅仅需要连接很难
IDE—Eclipse
make
makefile描述模块间的依赖关系;
make命令根据makefile对程序进行管理和维护;make判断被维护文件的时序关系
make [-f filename] [targetname]
使用方法:
v make 自动找当前目录下名为Makefile/makefile的文件
v make –f 文件名 找当前目录下指定文件名的文件
规则
一条规则包含3个方面的内容,
1)要创建的目标(文件),
2)创建目标(文件)所依赖的文件列表;
3)通过依赖文件创建目标文件的命令组
规则一般形式
1 | *target* ... : *prerequisites* ... |
每条规则由一个带冒号的“依赖行”和一条或多条以tab开头的“命令行”组成
目标1 [目标2…]:[依赖文件列表]
[\t 命令]
…
ex:
1 | *make_test:make_main.o* *wrtlog.o* |
冒号左边是目标,冒号右边是依赖文件
目标和依赖文件均是由字母、数字、句点和斜杠组成的字符串
目标或依赖文件的数目多于一个时,以空格分隔

一个简单的makefile
1 | edit : main.o kbd.o command.o display.o insert.o search.o files.o utils.o |
default goal
在缺省的情况下,make从makefile中的第一个目标开始执行
Make的工作过程类似一次深度优先遍历过程
自定义变量
例:
object=main.o Add.o Sub.o Mul.o Div.o
exe : $(object)
gcc -o exe $(object)
特殊变量
$@:表示目标文件;
$^:表示所有依赖目标的集合,以空格分隔;
$<:表示第一个依赖文件;
make能够自动推导文件以及文件依赖关系后面的命令
例:
object=main.o Add.o Sub.o Mul.o Div.o
exe : $(object)
gcc -o $@ $(object)
main.o : def.h
lmakefile使用.PHONY关键字来定义一个伪目标,具体格式为:
.PHONY : 伪目标名称
例:
.PHONY : clean
clean :
rm $(object)
| 命令 | 解释 | 示例 |
|---|---|---|
| file <文件名> | 加载被调试的可执行程序文件。 因为一般都在被调试程序所在目录下执行GDB,因而文本名不需要带路径。 | (gdb) file gdb-sample |
| r | Run的简写,运行被调试的程序。 如果此前没有下过断点,则执行完整个程序;如果有断点,则程序暂停在第一个可用断点处。 | (gdb) r |
| c | Continue的简写,继续执行被调试程序,直至下一个断点或程序结束。 | (gdb) c |
| b <行号> b <函数名称> b *<函数名称> b *<代码地址>d [编号] | b: Breakpoint的简写,设置断点。两可以使用“行号”“函数名称”“执行地址”等方式指定断点位置。 其中在函数名称前面加“*”符号表示将断点设置在“由编译器生成的prolog代码处”。如果不了解汇编,可以不予理会此用法。d: Delete breakpoint的简写,删除指定编号的某个断点,或删除所有断点。断点编号从1开始递增。 | (gdb) b 8 (gdb) b main (gdb) b *main (gdb) b *0x804835c(gdb) d |
| s, n | s: 执行一行源程序代码,如果此行代码中有函数调用,则进入该函数; n: 执行一行源程序代码,此行代码中的函数调用也一并执行。s 相当于其它调试器中的“Step Into (单步跟踪进入)”; n 相当于其它调试器中的“Step Over (单步跟踪)”。这两个命令必须在有源代码调试信息的情况下才可以使用(GCC编译时使用“-g”参数)。 | (gdb) s (gdb) n |
| si, ni | si命令类似于s命令,ni命令类似于n命令。所不同的是,这两个命令(si/ni)所针对的是汇编指令,而s/n针对的是源代码。 | (gdb) si (gdb) ni |
| p <变量名称> | Print的简写,显示指定变量(临时变量或全局变量)的值。 | (gdb) p i (gdb) p nGlobalVar |
| display …undisplay <编号> | display,设置程序中断后欲显示的数据及其格式。 例如,如果希望每次程序中断后可以看到即将被执行的下一条汇编指令,可以使用命令 “display /i pc”其中pc”其中pc 代表当前汇编指令,/i 表示以十六进行显示。当需要关心汇编代码时,此命令相当有用。undispaly,取消先前的display设置,编号从1开始递增。 | (gdb) display /i $pc(gdb) undisplay 1 |
| i | Info的简写,用于显示各类信息,详情请查阅“help i”。 | (gdb) i r |
| q | Quit的简写,退出GDB调试环境。 | (gdb) q |
| help [命令名称] | GDB帮助命令,提供对GDB名种命令的解释说明。 如果指定了“命令名称”参数,则显示该命令的详细说明;如果没有指定参数,则分类显示所有GDB命令,供用户进一步浏览和查询。 | (gdb) help display |


1 | struct stat { |
命令查看:ls -l file
获取文件属性
1 |
|
Unix/Linux系统支持的文件类型:
查看文件类型
使用命令:ls –l /dev/sda1
1 |
|
st_mode存储文件类型和许可权限,形式如下:
type3 type2 type1 type0 suid sgid sticky rwx rwx rwx
用来确定文件类型的宏:
S_ISBLK – 测试块文件
S_ISCHR – 测试字符文件
S_ISDIR – 测试目录
S_ISFIFO – 测试FIFO
S_ISREG – 测试普通文件
S_ISLNK – 测试符号链接
1 |
|


读的权限:显示目录文件,进入目录
写的权限:目录下创建文件
执行的权限:显示目录文件,进入目录,创建文件


1 |
|
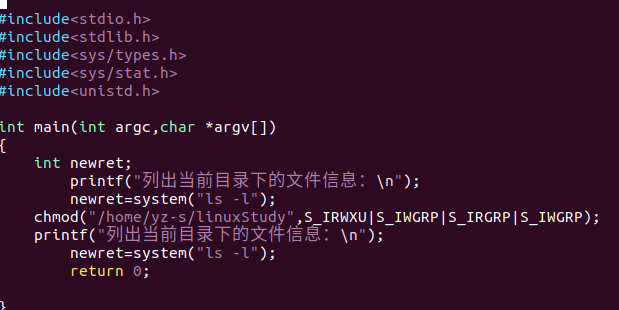
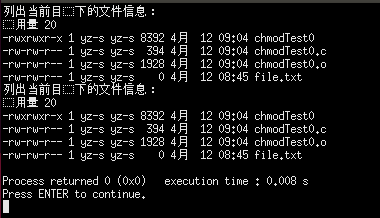
1 | chmod 函数 |

新创建的文件和目录的默认权限是(root)
File: -rw-r–r– 644
Directory: drwxr-xr-x 755
Why?
umask: 包含未被设置为权限位的==八进制数字(即无x位(可执行位))==。默认002为普通用户,022为root用户。666-644=022
1 |
|
1 | umask 函数 |
1 | 改变文件所有者 |
1 |
|
1 |
|
基本 I/O
非负整数
int fd;
(in <unistd.h>)
STDIN_FILENO (0), STDOUT_FILENO (1), STDERR_FILENO (2)
文件操作一般步骤:
open-read/write-[lseek]-close


1 | UNIX方式 |
1 | create a file or device |
1 |
|
“mode”: 指定创建的新文件的存取权限

umask: 一种文件保护机制
新建文件的初始存取权限

1 | Open and possibly create a file or device |
1 |
|
1 | “flags”: 指定文件存取方式 |
1 | Close a file descriptor |
1 | Read from a file descriptor |
1 |
|
read/write 定位文件指针
1 |
|
该指令的“那里”:
SEEK_SET: the offset is set to “offset” bytes指针位移量为设定值
SEEK_CUR: the offset is set to its current location plus “offset” bytes指针位移量为当前位移加设定值
SEEK_END: the offset is set to the size of the file plus “offset” bytes指针位移量为文件尾加设定值

使用lseek修改文件偏移量后,当前文件偏移量有可能大于文件的长度
在这种情况下,对该文件的下一次写操作,将加长该文件
这样文件中形成了一个空洞。对空洞区域进行读,均返回0

1 | 复制文件描述符 |


假设进程已打开文件描述符0、1、2
调用dup2(1, 6),dup2返回值是多少?
然后再调用dup(6),dup返回值是多少?


1 | 查看、修改打开的文件描述符 |
lcmd取值:
F_DUPFD 复制文件描述符
F_GETFD 获得文件描述符
F_SETFD 设置文件描述符
F_GETFL 获取文件描述符当前模式
F_SETFL设置文件描述符当前模式
F_GETLK 获得记录锁
F_SETLK 设置记录锁
1 | 分析以下程序运行情况 |
1 | 分析以下程序运行结果 |
为什么要设计标准I/O库?
直接使用API进行文件访问时,需要考虑许多细节问题
例如:read、write时,缓冲区的大小该如何确定,才能使效率最优
标准I/O库封装了诸多细节问题,包括缓冲区分配
I/O效率示例
1 |
|

原因
标准I/O库提供缓冲的目的:尽可能减少使用read、write调用的次数,以提高I/O效率。
通过标准I/O库进行的读写操作,数据都会被放置在标准I/O库缓冲中中转。
1 | typedef struct { |
1 |
|
1 | Open a stream |
对流有三种读写方式
每次读写一个字符
每次读写一行
每次读写任意长度的内容
1 | 输入 |
1 |
|
1 |
|
1 | /*程序:把帐号信息从文件读出*/ |
1 |
|
1 |
|
1 |
|

刷新文件流。把流里的数据立刻写入文件—fork前使用fflush
#include <stdio.h>
int fflush(FILE *stream);
自动刷新:
例: for(i=1;i<=10;i++) fputc(c,stdout);
fputc("\n",stdout);
全缓冲
行缓冲
不带缓冲
确定流使用的底层文件描述符
#include <stdio.h>
int fileno(FILE *fp);
根据已打开的文件描述符创建一个流
#include <stdio.h>
FILE *fdopen(int fildes, const char *mode);
mkdir/rmdir
chdir/fchdir, getcwd
读目录操作
opendir/closedir
readdir
telldir
seekdir
1 |
|

数据结构
DIR, struct dirent
操作函数
opendir/closedir
readdir
telldir
seekdir
DIR
目录流对象的数据结构
in <dirent.h>
typedef struct __dirstream DIR;
struct dirent
目录项
Defined in <dirent.h>
ino_t d_ino; /* inode number /
char d_name[NAME_MAX + 1]; / file name */
目录的打开、关闭、读、定位
#include <sys/types.h>
#include <dirent.h>
DIR *opendir(const char *name);
int closedir(DIR *dir);
struct dirent *readdir(DIR *dir);
off_t telldir(DIR *dir);
void seekdir(DIR *dir, off_t offset);
1 | DIR *dp; |
创建一个空目录
#include <sys/stat.h>
#include <sys/types.h>
int mkdir(const char *pathname, mode_t mode);
(Return: 0 if success; -1 if failure)
删除一个空目录
#include <unistd.h>
int rmdir(const char *pathname);
(Return: 0 if success; -1 if failure)
Change working directory
#include <unistd.h>
int chdir(const char *path);
int fchdir(int fd);
(Return: 0 if success; -1 if failure)
当前工作目录是进程的属性,所以该函数只影响调用chdir的进程本身
cd(1) command
ln 命令
link/unlink 函数
给一个文件创建一个链接.
#include <unistd.h>
int link(const char *oldpath, const char *newpath);
(Return: 0 if success; -1 if failure)
删除文件链接
#include <unistd.h>
int unlink(const char *pathname);
(Return: 0 if success; -1 if failure)
ln –s命令
创建一个符号链接
#include <unistd.h>
int symlink(const char *oldpath, const char *newpath);
(Return: 0 if success; -1 if failure)
读取符号链接的值
#include <unistd.h>
int readlink(const char *path, char *buf, size_t bufsiz);
(Return: the count of characters placed in the buffer if success; -1 if failure)
1 |
|

1 |
|
1.设备文件名
ls –C 列出当前系统加载的设备对应的文件
ls –li 列出当前终端设备的属性
2.设备文件读写
open,read,write,close,stat
1 |
|
C 库函数 int fseek(FILE *stream, long int offset, int whence) 设置流 stream 的文件位置为给定的偏移 offset,参数 offset 意味着从给定的 whence 位置查找的字节数。
下面是 fseek() 函数的声明。
1 | int fseek(FILE *stream, long int offset, int whence) |
| 常量 | 描述 |
|---|---|
| SEEK_SET | 文件的开头 |
| SEEK_CUR | 文件指针的当前位置 |
| SEEK_END | 文件的末尾 |
将文件指针重新指向文件开头
头文件:#include <sys/types.h> #include <dirent.h>
定义函数:struct dirent * readdir(DIR * dir);
函数说明:readdir()返回参数dir 目录流的下个目录进入点。结构dirent 定义如下:
struct dirent
{
ino_t d_ino; //d_ino 此目录进入点的inode
ff_t d_off; //d_off 目录文件开头至此目录进入点的位移
signed short int d_reclen; //d_reclen _name 的长度, 不包含NULL 字符
unsigned char d_type; //d_type d_name 所指的文件类型 d_name 文件名
har d_name[256];
};
返回值:成功则返回下个目录进入点. 有错误发生或读取到目录文件尾则返回NULL.
头文件:#include <stdio.h>
定义函数:FILE * fdopen(int fildes, const char * mode);
**函数说明:fdopen()会将参数fildes 的文件描述词, 转换为对应的文件指针后返回.参数mode 字符串则代表着文件指针的流形态, 此形态必须和原先文件描述词读写模式相同. 关于mode 字符串格式请参考fopen(). **
返回值:转换成功时返回指向该流的文件指针. 失败则返回NULL, 并把错误代码存在errno 中.
头文件:#include <sys/types.h> #include <dirent.h>
函数:DIR *opendir(const char *name);
含义: opendir()用来打开参数name 指定的目录, 并返回DIR*形态的目录流, 和open()类似, 接下来对目录的读取和搜索都要使用此返回值.
头文件:#include<sys/types.h> #include <dirent.h>
函数:struct dirent *readdir(DIR *dir);
含义:readdir()返回参数dir 目录流的下个目录进入点。
struct dirent
{
ino_t d_ino; //d_ino 此目录进入点的inode
ff_t d_off; //d_off 目录文件开头至此目录进入点的位移
signed short int d_reclen; //d_reclen _name 的长度, 不包含NULL 字符
unsigned char d_type; //d_type d_name 所指的文件类型 d_name 文件名
har d_name[256];
};
功 能:把文件流指针转换成文件描述符
相关函数:open, fopen
表头文件:#include <stdio.h>
定义函数:int fileno(FILE *stream)
函数说明:fileno()用来取得参数stream指定的文件流所使用的文件描述词
返回值 :返回和stream文件流对应的文件描述符。如果失败,返回-1。
范例:
#include <stdio.h>
main()
{
FILE *fp;
int fd;
fp = fopen(“/etc/passwd”, “r”);
fd = fileno(fp);
printf(“fd = %d\n”, fd);
fclose(fp);
}
文件描述词是Linux编程中的一个术语。当一个文件打开后,系统会分配一部分资源来保存该文件的信息,以后对文件的操作就可以直接引用该部分资源了。文件描述词可以认为是该部分资源的一个索引,在打开文件时返回。在使用fcntl函数对文件的一些属性进行设置时就需要一个文件描述词参数。
以前知道,当程序执行时,就已经有三个文件流打开了,它们分别是标准输入stdin,标准输出stdout和标准错误输出stderr。和流式文件相对应的是,也有三个文件描述符被预先打开,它们分别是0,1,2,代表标准输入、标准输出和标准错误输出。需要指出的是,上面的流式文件输入、输出和文件描述符的输入输出方式不能混用,否则会造成混乱。
头文件:#include <dirent.h>
定义函数:off_t telldir(DIR *dir);
函数说明:telldir()返回参数dir 目录流目前的读取位置. 此返回值代表距离目录文件开头的偏移量返回值返回下个读取位置, 有错误发生时返回-1.
_exit()函数的作用最为简单:直接使进程停止运行,清除其使用的内存空间,并销毁其在内核中的各种数据结构;exit() 函数则在这些基础上作了一些包装,在执行退出之前加了若干道工序。
exit()函数与_exit()函数最大的区别就在于exit()函数在调用exit系统调用之前要检查文件的打开情况,把文件缓冲区中的内容写回文件,就是”清理I/O缓冲”。
在应用编程层面,程序对流的操作体现在文件流指针FILE上,在操作一个文件前,需要打开该文件,而使用ANSI C库函数fopen()打开一个文件后,将返回一个文件流指针与该文件关联,所有针对该文件的读写操作都通过该文件流指针完成,以下是应用层所能访问的FILE结构体,因此,结构体成员可以在用户空间中访问。
typedef struct _IO_FILE FILE;
struct _IO_FILE{
int _flags;
char* _IO_read_ptr; //如果以读打开,当前读指针
char* _IO_read_end; //如果以读打开,读区域结束位置
char* _IO_read_base; //Start of putback+get area
char* _IO_write_base; //如果以写打开,写区起始区
char* _IO_write_ptr; //如果以写打开,当前写指针
char* _IO_write_end; //如果以写打开,写区域结束位置
char* _IO_buf_base; //如果显示设置缓冲区,其起始位置
char* _IO_buf_end; //如果显示设置缓冲区,其结束位置。
…
int _fileno; //文件描述符
…
}
在此结构体中,包含了I/O库为管理该流所需要的所有信息,如用于实现I/O的文件描述符、指向流缓冲区的指针、缓冲区的长度、当前在缓冲区中的字符数和出错标志等。
大部分的Linux文件系统(如ext2、ext3)规定,一个文件由目录项、inode和数据块组成:
Linux系统中,目录(directory)也是一种文件。打开目录,实际上就是打开目录文件。
目录文件的结构非常简单,就是一系列目录项(dirent)的列表。每个目录项,由两部分组成:所包含文件的文件名,以及该文件名对应的inode号码。


!==[image-20210610214926804]==(D:\SyncDisk\笔记整理\Linux\image-20210610214926804.png)


进程:一个或多个线程执行的地址空间,线程执行时需要系统资源
System call “fork” 系统调用fork
Process resources
struct task_struct
System space stack
…
System call “exec”系统调用exec
The entry of C programs C程序入口
进程终止的五种方式
Normal termination 正常终止
Return from “main” function 从main函数返回
Call “exit” function 调用exit函数
Call “_exit” function 调用_exit函数
Abnormal termination 异常终止
Call “abort” function 调用abort函数
Terminated by a signal 信号终止
Foreground process前台进程
要求用户启动它们或与它们交互的进程称为前台进程。
前台进程不结束,终端就不会出现系统提示符,直到进程终止。
缺省情况下,程序和命令作为前台进程运行。
Background process 后台进程
独立于用户运行的进程称为后台进程。
用户在输入命令行后加上“&”字符然后按
Shell不等待命令终止,就立即出现系统提示符,让该命令进程在后台运行,用户可以继续执行新的命令。
Daemon 守护进程
总是运行在后台的系统进程。
守护程序通常在系统启动时启动,并且它们一直运行到系统停止。
守护进程常常用于向用户提供各种类型的服务和执行系统管理任务。
守护程序进程由 root 用户或 root shell 启动,并只能由 root 用户停止。

fork: create a child process
#include <sys/types.h>
#include <unistd.h>
pid_t fork(void);
returned value:
pid of child (in the current (parent) process),
0 (in child process),
-1 (failure)
fork创建子进程代码结构
……
pid = fork();
if (pid<0) {perror(“fork()”);exit(1);}
else if (pid==0) { child process }
else { parent process }
所有由父进程打开的描述符都被复制到子进程中。父、子进程每个相同的打开描述符共享一个文件表项

1 | int main(int argc,char *argv[]) |
1 | 单个进程 |
进程复制自己,使父子进程同一时刻执行不同的代码——网络服务
进程要执行另一个不同的程序:fork-exec——shell
Question:效率问题?父子进程各自占一段逻辑地址空间,fork之后立即exec,地址空间浪费。
“写—复制”
vfork
#include <sys/types.h>
#include <unistd.h>
pid_t vfork(void);
功能:类似fork,创建一个新进程,效率髙。
与fork区别:
(1) vfork创建的进程与父进程共用地址空间
(2) vfork创建子进程后,阻塞父进程,直到子进程调用exec或exit,内核才唤醒父进程。
1 | int global=5; |
函数原型:
#include <unistd.h>
unsigned int sleep(unsigned int seconds);
seconds:暂停时间(秒)
用一个新的进程映像替换当前的进程映像,执行新程序的进程保持原进程的一系列特征:
pid, ppid, uid, gid, working directory, root directory …
#include <unistd.h>
extern char **environ;
int execl(const char *path, const char *arg, …);
int execlp(const char *file, const char *arg, …);
int execle(const char *path, const char *arg, …, char * const envp[]);
int execv(const char *path, char * const argv[]);
int execvp(const char *file, char * const argv[]);
int execve(const char *filename, char * const argv[], char * const envp[]);
1.两大类:
execl开头:参数以列表形式arg0,arg1…NULL结束。
execv开头:参数以指向字符串数组argv[]指针形式,arg[0]必须为程序名。
2.含有字母p的函数可以使用相对路径,根据环境变量PATH查找文件;其他函数必须使用绝对路径;
3.含有字母e的函数,需要通过指向envp[]数组的指针指明新的环境变量,其他函数使用当前环境变量。
1 | 用exec函数使新进程执行“/bin/ps” 程序。 |
父子进程各自执行不同的代码,进程要执行另一个程序.
1 | printf("%% "); /* print prompt */ |
函数原型:
#include <stdlib.h>
void exit(int status);
status:进程状态
功能:正常终止目前进程的执行,把参数status返回给父进程,进程所有的缓冲区数据会自动写回并关闭未关闭的文件。
函数原型:
#include <stdlib.h>
void ——exit(int status);
status:进程状态
功能:立刻终止目前进程的执行,把参数status返回给父进程,并关闭未关闭的文件。不处理标准I/O缓冲区。
父进程在子进程前终止——孤儿进程
Orphan process——init
子进程在父进程前终止——可能成为僵尸进程
SIGCHLD signal 忽略SIGCHLD信号
Handled by wait/waitpid in parent 父进程中用wait/waitpid处理
Not handled by wait/waitpid in parent -> zombie父进程没有用wait/waitpid处理->僵尸进程
僵尸进程:已终止运行,但尚未被清除的进程。
子进程运行结束后(正常或异常),它并没有马上从系统的进程分配表中被删掉,而是进入僵死状态(Zombie),一直等到父进程来回收它的结束状态信息。
1 | main() |
僵尸进程的proc结构一直存在直到父进程正常结束或系统重启
如何消除僵尸进程?
方法一:wait/waitpid阻塞父进程,子进程先终止
方法二:父进程不阻塞,两次fork
方法三:使用signal信号处理
1 | main() |
#include <sys/types.h>
#include <sys/wait.h>
pid_t wait(int *status);
pid_t waitpid(pid_t pid, int *status, int options);
waitpid的第一个参数pid的意义:
pid > 0: 等待进程id为pid的子进程。
pid == 0: 等待与自己同组的任意子进程。
pid == -1: 等待任意一个子进程
pid < -1: 等待进程组号为-pid的任意子进程。因此,wait(&stat)等价于waitpid(-1, &stat, 0)
waitpid例子
1 |
|
1 | int main(void) |
Singnal函数处理:
(1)设置信号处理函数
signal(SIGCHLD,fun)
(2)忽略子进程终止信号
signal(SIGCHLD,SIG_IGN)
内核回收


进程组
一个或多个过程的集合
getpgrp/setpgid functions
会话期Session
一个或多个进程组的集合。
getsid/setsid function
setsid函数


精灵进程或守护进程
后台执行, 没有控制终端或登录 Shell 的进程
Init:进程1,启动系统服务
Keventd:为内核中运行的函数提供进程上下文
Kswapd:页面调出守护进程
bdflush,kupdated:调整缓存中的数据写到磁盘
portmap:将RPC程序号映射为端口号
inetd(xinetd):侦听网络接口,获取网络服务进程请求
注意:大多数守护进程都以超级用户(用户ID为0)特权运行。没有一个守护进程具有控制终端,其终端名设置为问号(?)。
daemon特征:
sid,pid,pgid相同,均为pid
ppid为1
tty为?
编程规则
首先调用fork,然后使父进程exit
调用setsid创建一个新的会话期 setsid()
将当前工作目录更改为特定目录chdir(./)
进程的umask设为0 umask(0)
关闭不需要的文件描述符 close()
1 | int daemon_init(void) { |
(1)创建子进程,终止父进程
pid=fork();
if(pid>0)
{exit(0);} /终止父进程/
(2)在子进程中创建新会话
setsid函数用于创建一个新的会话,并担任该会话组的组长,其作用:
①让进程摆脱原会话的控制;
②让进程摆脱原进程组的控制;
③让进程摆脱原控制终端的控制。
而setsid函数能够使进程完全独立出来,从而脱离所有其他进程的控制。
(3)改变工作目录
改变工作目录的常见函数是chdir。
(4)重设文件创建掩码
文件创建掩码是指屏蔽掉文件创建时的对应位。
把文件创建掩码设置为0,可以大大增强该守护进程的灵活性。
设置文件创建掩码的函数是umask。
(5)关闭文件描述符
通常按如下方式关闭文件描述符:
for(i=0;i<NOFILE;i++)
close(i);
或者也可以用如下方式:
for(i=0;i<MAXFILE;i++)
close(i);

1 | /*主程序每隔一分钟向/tmp目录中的日志3-7.log报告运行状态*/ |
注意:fopen函数必须具有root权限。如果没有root权限,可以看到守护进程的运行,但不会在文件里写入任何字符。

1 |
|
注意:调用openlog、syslog函数,操作的系统日志文件“/var/log/syslog”或“/var/log/messages ”,必须具有root权限。
openlog函数说明

syslog函数说明

信号
Software interrupt软件中断
Mechanism for handling asynchronous events异步事件
Having a name (beginning with SIG)
Defined as a positive integer (in <signal.h>)
信号产生
按终端键,硬件异常,kill(2)函数,kill(1)命令,软件条件,…
SIG信号(1-31)是从UNIX系统中继承下来的称为不可靠信号(也称为非实时信号)。
SIGRTMIN~SIGRTMAX是为了解决前面“不可靠信号”问题而进行更改和扩充的信号,称为可靠信号(也称为实时信号)。
可靠信号(实时信号):支持排队,发送用户进程一次就注册一次,发现相同信号已经在进程中注册,也要再注册。
不可靠信号(非实时信号):不支持排队,发送用户进程判断后注册,发现相同信号已经在进程中注册,就不再注册,忽略该信号。
| 名称 | **说明 ** | 默认操作 |
|---|---|---|
| SIGABRT | 进程异常终止(调用abort函数产生此信号) | |
| SIGALRM | 超时(alarm) | 终止 |
| SIGFPE | 算术运算异常(除以0,浮点溢出等) | |
| SIGHUP | 连接断开 | 终止 |
| SIGILL | 非法硬件指令 | |
| SIGINT | 终端终端符(Clt**-C)** | 终止 |
| SIGKILL | 立即结束程序运行(不能被捕捉、阻塞或忽略) | 终止 |
| SIGPIPE | 向没有读进程的管道写数据 | |
| SIGQUIT | 终端退出符(Clt-\) | 终止 |
| SIGTERM | 终止(由kill命令发出的系统默认终止信号) | 退出 |
| SIGUSR1 | 用户定义信号 | 退出 |
| SIGUSR2 | 用户定义信号 | 退出 |
| SIGSEGV | 无效存储访问(段违例) | |
|---|---|---|
| SIGCHLD | 子进程停止或退出 | 忽略 |
| SIGCONT | 使暂停进程继续 | 继续/忽略 |
| SIGSTOP | 暂停一个进程(不能被捕捉、阻塞或忽略) | 终止 |
| SIGTSTP | 终端挂起符(Clt-Z) | 停止进程 |
| SIGTTIN | 后台进程请求从控制终端读 | |
| SIGTTOUT | 后台进程请求向控制终端写 |
忽略信号
不能忽略的信号:
SIGKILL, SIGSTOP
一些硬件异常信号
执行系统默认动作
捕捉信号
Kill
• 暂停 kill –STOP
• 恢复 kill –CONT
• 终止 kill –KILL
| 函数 | 功能 |
|---|---|
| kill | 发送信号给进程或进程组 |
| raise | 发送信号给进程自身 |
| alarm | 定时器时间到,向进程发送SIGALRM信号 |
| pause | 没有捕捉信号前一直将进程挂起 |
| signal | 捕捉信号SIGINT, SIGQUIT时执行信号处理函数 |
| sigemptyset | 初始化信号集合为空 |
|---|---|
| sigfillset | 初始化信号集合为所有信号集合 |
| sigaddset | 将指定信号加入到指定集合 |
| sigdelset | 将指定信号从信号集中删除 |
| sigprocmask | 判断检测或更改信号屏蔽字 |
kill: send signal to a process
#include <sys/types.h>
#include <signal.h>
int kill(pid_t pid, int sig);
(Returned Value: 0 if success, -1 if failure)
The “pid” parameter
pid > 0: 发送信号给进程id为pid的进程。
pid =0:发送信号给与自己同组的所有进程。
pid = -1: 发送系统内所有进程
pid < -1: 发送给进程组号为-pid的所有进程。
raise: send a signal to the current process
#include <signal.h>
int raise(int sig);
(Returned Value: 0 if success, -1 if failure)
分析:用户进程fork子进程后,子进程使用raise函数发送SIGSTOP信号,使自己暂停;父进程使用kill函数向子进程发送SIGKILL信号,子进程收到信号结束。
1 | int main () |
为编号为sgn的信号安装一个新的信号处理程序。
#include <signal.h>
typedef void (*sighandler_t)(int);
sighandler_t signal(int signum, sighandler_t handler);
(Returned Value: the previous handler if success, SIG_ERR if error)
The “handler” parameter
a user specified function, or
SIG_DFL, or
SIG_IGN
1 | static void sig_usr(int); |
alarm: 为信号的传送设置闹钟
#include <unistd.h>
unsigned int alarm(unsigned int seconds);
(Returned value: 0, or the number of seconds remaining of previous alarm)
pause: wait for a signal
#include <unistd.h>
int pause(void);
(Returned value: -1, errno is set to be EINTR)
有时既不希望进程在接收到信号时立刻中断进程的执行,也不希望此信号完全被忽略掉,而是延迟一段时间再去调用信号处理函数,这个时候就需要信号阻塞来完成。
#include <signal.h>
int sigemptyset(sigset_t *set);
int sigfillset(sigset_t *set);
int sigaddset(sigset_t *set,int signum);
int sigdelset(sigset_t *set,int signum);
int sigismember(const sigset_t *set,int signum);
参数:set 信号集 ;signum 信号
返回值:若成功返回0,若出错返回-1。
sigismember若真返回1,若假返回0,若出错返回-1。
1 |
|
#include <signal.h>
功能:检测或更改信号屏蔽字
函数:int sigprocmask(int how,const sigsett_t *set,sigset_t *oldset);
参数:how 操作方式set
how决定函数的操作方式。
SIG_BLOCK:增加一个信号集合到当前进程的阻塞集合之中。
SIG_UNBLOCK:从当前的阻塞集合之中删除一个信号集合。
SIG_SETMASK:将当前的信号集合设置为信号阻塞集合。
返回值:若成功返回0,若出错返回-1。
1 |
|
程序先定义信号集set,然后把信号SIGINT添加到set信号集中,最后把set设置为信号阻塞集合。运行程序时,进程进入死循环。按“ctrl+c”系统并没有中断程序,SIGINT信号屏蔽掉了。按”ctrl+z”来结束程序。
1 | void handler() |
IPC: Inter-Process Communication 进程间通信
IPC机制
shared file
signal
pipe, FIFO (named pipe), message queue, semaphore, shared memory
socket

Simple Client-Server or IPC model

Pipe
Pipe mechanism in a shellShell中的管道机构
e.g. cmd1 | cmd2
Pipe is half-duplex 半双工
管道只能在共同祖先的进程间使用
管道也是文件
命名管道(FIFO)
The pipe function: create a pipe
#include <unistd.h>
int pipe(int filedes[2]);
(Returned value: 0 if success, -1 if failure)
A pipe: First In, First Out
filedes[0]:read, filedes[1]: write


类似共享文件
pipe—write——read
父-子进程/子-子进程
使用模式:
pipe——fork——write(写进程)
——read(读进程)
注意:pipe-fork顺序
管道:shell中的形式
cmd1 | cmd2
重定向 cmd > file
实现代码
执行cmd1前
if (fd[1] != STDOUT_FILENO) {
if (dup2(fd[1], STDOUT_FILENO) != STDOUT_FILENO)
err_sys(“dup2 error to stdout);
}
执行cmd2前
if (fd[0] != STDIN_FILENO) {
if (dup2(fd[0], STDIN_FILENO) != STDIN_FILENO)
err_sys(“dup2 error to stdin);
}

1 | int main() |
od –c file 以字符方式显示文件内容,如果没指定文件则以标准输入作为默认输入
#include <stdio.h>
FILE *popen(const char *command, const char *type);
int pclose(FILE *stream);

fp=popen(cmd,”r”)的pipe实现:
FILE * popen(char * cmd,char * type)
{ int fd; int p;
pipe(fd);
p=fork();
if(p==0) { close(1);dup(fd[1]);
execl(cmd,cmd,NULL); }
else { wait();
fp=fdopen(fd[0],”r”); return fp; }
}

1 | int main () |
使用popen函数读写管道,实际上也是调用pipe函数建立一个管道,再调用fork函数建立子进程,接着会建立一个shell环境,并在这个shell环境中执行参数指定的进程。
popen_two.c
gcc myuclc.c -o myuclc
gcc popen_two.c -o two
输入大写字母
按Ctrl+D结束程序
1 | 程序头文件 |
管道和命名管道
相同点
不同点
文件系统中
内存传输数据
同步:一个重要的考虑
mkfifo(1), mkfifo(3), mknod(1), mknod(2)
命令行方式:mknod filename p
mkfifo filename
程序方式:mkfifo: make a FIFO special file (a named pipe)
#include <sys/types.h>
#include <sys/stat.h>
int mkfifo(const char *pathname, mode_t mode);
(Returned value: 0 if success, -1 if failure)
例: mkfifo(“/tmp/myfifo”,0666)
命令行方式
(1)cat < /tmp/myfifo 读FIFO文件
(2)echo hello >/tmp/myfifo 向FIFO写数据
(3)cat < /tmp/myfifo &
echo “hello” >/tmp/myfifo
Review: “open” system call
int open(const char *pathname, int flags);
“flags” parameter
必须指定的互斥模式:
O_RDONLY, O_WRONLY, O_NONBLOCK
O_RDONLY:若无进程写方式打开FIFO,open阻塞
O_RDONLY |O_NONBLOCK:若无进程写方式打开FIFO,open立即返回文件描述符
O_WRONLY:若无进程读方式打开FIFO,open阻塞
O_WRONLY| O_NONBLOCK:若无进程读方式打开FIFO,open返回ENXIO错误,-1
1 |
用FIFO复制输出流

mkfifo fifo1
prog3 < fifo1 &
prog1 < infile | tee fifo1 | prog2
tee命令读取标准输入,把这些内容同时输出到标准输出和(多个)文件中

C/S应用程序

1 | //Client.h |
Zhang.c
Li.c
1 | int main() |
进程间通信(interprocess communication)
IPC objects
信号量(semaphore set)
消息队列(message queue)
共享内存(shared memory)
shell命令
ipcs -q/-m/-s
ipcrm –q/-m/-s
ipcrm -Q/-M/-S
标识符与关键字
创建IPC对象时指定关键字(key_t key;)
key的选择;预定义常数IPC_PRIVATE;ftok函数
引用IPC对象:标识符
内核将关键字转换成标识符
许可权结构
和文件类比
struct ipc_perm
| 功能 | 消息队列 | 信号量 | 共享内存 |
|---|---|---|---|
| 分配一个IPC对象,获得对IPC的访问 | msgget | semget | shmget |
| IPC操作: 发送/接收消息,信号量操作,连接/释放共享内存 | msgsnd/ msgrcv | semop | shmat/ shmdt |
| IPC控制:获得/修改状态信息,取消IPC | msgctl | semctl | shmctl |
创建函数
key_t ftok( char * filename, int id);
功能说明
将一个已存在的文件名(该文件必须是存在而且可以访问的)和一个整数标识符id转换成一个key_t值
在Linux系统实现中,调用该函数时,系统将文件的索引节点号取出,并在前面加上子序号,从而得到key_t的返回值
key:可由ftok()函数产生或定义为IPC_PRIVATE常量
flag:包括读写权限,还可包含IPC_CREATE和IPC_EXCL标志位,组合效果如下

消息队列
消息队列是消息的链表,存放在内核中并由消息队列标识符标识。
First in, first out
message type: 优先级=
块数据
proto.h:约定的消息队列通信格式
send.c
receive.c
proto.h:约定的消息队列通信格式:
#define KEYPATH “/etc/services”
#define KEYPROJ ‘a’
struct msg_st {
char * msg;
long type;
…
}
#include <sys/types.h>
#include <sys/ipc.h>
#include <sys/msg.h>
int msgget(key_t key, int flag);
int msgsnd(int msqid, const void *ptr, size_t nbytes, int flag);
int msgrcv(int msqid, void *ptr, size_t nbytes, long type, int flag);
int msgctl(int msqid, int cmd, struct shmid_ds *buf);
Ø函数原型 int msgget(key_t key, int flag);
Ø参数说明
ü key:待创建/打开队列的键值
ü flag:创建/打开方式
常取IPC_CREAT|IPC_EXCL|0666
若不存在key值的队列,则创建;否则,若存在,则打开队列
0666表示与一般文件权限一样
Ø返回值
成功返回消息队列描述字,否则返回-1
Ø说明
IPC_CREAT一般由服务器程序创建消息队列时使用
若是客户程序,须打开现有消息队列,而不用IPC_CREAT
Ø函数原型
int msgsnd(int msqid, struct msgbuf *msgp, size_t size, int flag);
Ø说明
flag有意义的标志为IPC_NOWAIT,指明在消息队列没有足够空间容纳要发送的消息时,msgsnd是否等待
Ø内核须对msgsnd( )函数完成的工作
ü检查消息队列描述符、许可权及消息长度
若合法,继续执行;否则,返回
ü内核为消息分配数据区,将消息正文拷贝到消息数据区
ü分配消息首部,并将它链入消息队列的末尾
ü修改消息队列头数据,如队列中的消息数、字节总数等
ü唤醒等待消息的进程
Øint msgrcv(int msqid, void *ptr, size_t nbytes, long type, int flag);
Ø参数说明
l msgid:消息队列描述字
l msgp:消息存储位置
l size:消息内容的长度
l type:请求读取的消息类型
l flag:规定队列无消息时内核应做的操作
IPC_NOWAIT:无满足条件消息时返回,此时errno=ENOMSG
IPC_EXCEPT:type>0时使用,返回第一个类型不为type的消息
IPC_NOERROR:如果队列中满足条件的消息内容大于所请求的size字节,则把该消息截断,截断部分将丢失
函数原型
int msgctl(int msqid, int cmd, struct msqid_ds *buf);
“cmd” 参数
IPC_STAT: 把msqid_ds结构中的数据置为消息队列的当前关联值
IPC_SET: 在进程有足够权限的前提下,把消息队列的当前关联值置为msqid_ds结构给出的值
IPC_RMID: 删除消息队列
A C/S application
一台服务器,多个客户机:只需要一个队列。与FIFO实现相比
消息队列创建后,操作系统在内核中分配了一个名称为msqid_ds的数据结构用于管理该消息队列。
在程序中可以通过函数msgctl对该结构进行读写,从而实现对消息队列的控制功能。
成员说明:
1)msg_perm:IPC许可权限结构。
2)msg_stime:最后一次向该消息队列发送消息(msgsnd)的时间。
3)msg_rtime:最后一次从该消息队列接收消息(msgrcv)的时间。
4)msg_ctime:最后一次调用msgctl的时间。
5)msg_cbytes:当前该消息队列中的消息长度,以字节为单位。
6)msg_qnum:当前该消息队列中的消息条数。
7)msg_qbytes:该消息队列允许存储的最大长度,以字节为单位。
8)msg_lspid:最后一次向该消息队列发送消息(msgsnd)的进程ID。
9)msg_lrpid:最后一次从该消息队列接收消息(msgrcv)的进程ID。
使用:
msg_sinfo.msg_qbytes = 1666;
msgctl(msgqid,IPC_SET,&msg_sinfo)


共享内存是内核为进程创建的一个特殊内存段,它可连接(attach)到自己的地址空间,也可以连接到其它进程的地址空间
最快的进程间通信方式
不提供任何同步功能

mmap()系统调用
将普通文件在不同的进程中打开并映射到内存
不同进程通过访问映射来达到共享内存目的
POSIX共享内存机制(Linux 2.6未实现)
System V共享内存
在内存文件系统tmpfs中建立文件
文件映射到不同进程空间
lmmap()系统调用使得==进程之间通过映射同一个普通文件实现共享内存。普通文件被映射到进程地址空间后,进程可以像访问普通内存一样对文件进行访问,不必再调用read(),write()等操作。==
#include < unistd.h >
#include <sys/mman.h >
void* mmap ( void * addr , size_t len , int prot , int flags , int fd , off_t offset )
int munmap( void * addr, size_t len )
int msync ( void * addr , size_t len, int flags)
void* mmap ( void * addr , size_t len , int prot , int flags , int fd , off_t offset )
addr:指定文件应被映射到进程空间的起始地址,一般被指定一个空指针,此时选择起始地址的任务留给内核来完成。
len:映射到调用进程地址空间的字节数,从被映射文件开头offset个字节开始算起。
prot :指定共享内存的访问权限。可取如下几个值的或:PROT_READ(可读) , PROT_WRITE (可写), PROT_EXEC (可执行), PROT_NONE(不可访问)。
flags;指定映射对象的类型,映射选项和映射页是否可以共享。由以下几个常值指定:MAP_SHARED , MAP_PRIVATE 必选其一。
fd:为即将映射到进程空间的文件描述字,一般由open()返回,同时,fd可以指定为-1,此时须指定flags参数中的MAP_ANONYMOUS,表明进行的是匿名映射(不涉及具体的文件名,避免了文件的创建及打开,只能用于具有亲缘关系的进程间通信)。
offset参数一般设为0,表示从文件头开始映射。
函数的返回值为最后文件映射到进程空间的地址,进程可直接操作起始地址为该值的有效地址。
mmap()用于共享内存的两种方式 :
(1)使用普通文件提供的内存映射:适用于任何进程之间;需要打开或创建一个文件,然后再调用mmap();调用代码如下:
fd=open(name, flag, mode);
if(fd>0)
ptr=mmap(NULL, len , PROT_READ|PROT_WRITE,
MAP_SHARED , fd , 0);
(2) 使用特殊文件提供匿名内存映射:适用于具有亲缘关系的进程之间;
l调用代码如下:
ptr=mmap(NULL, len , PROT_READ|PROT_WRITE, MAP_SHARED|MAP_ANONYMOUS ,-1 , 0);
由于父子进程特殊的亲缘关系,在父进程中先调用mmap(),然后调用fork()。在调用fork()之后,子进程继承父进程匿名映射后的地址空间,也继承mmap()返回的地址
不必指定具体的文件,只要设置相应的标志即可
int munmap( void * addr, size_t len )
该调用在进程地址空间中解除一个映射关系,addr是调用mmap()时返回的地址,len是映射区的大小。当映射关系解除后,对原来映射地址的访问将导致段错误发生。
int msync ( void * addr , size_t len, int flags)
一般说来,进程在映射空间的对共享内容的改变并不直接写回到磁盘文件中,往往在调用munmap()后才执行该操作。可以通过调用msync()实现磁盘上文件内容与共享内存区的内容一致。
1 | typedef struct |
使用特殊文件提供匿名内存映射,适用于具有亲缘关系的进程之间。==一般而言,子进程单独维护从父进程继承下来的一些变量。而mmap函数的返回地址,由父子进程共同维护。==
通过映射到tmpfs中的shm文件对象实现共享主存
创建过程
#include <sys/types.h>
#include <sys/ipc.h>
#include <sys/shm.h>
int shmget(key_t key, int size, int flag);
void *shmat(int shmid, void *addr, int flag);
int shmdt(void *addr);
int shmctl(int shmid, int cmd, struct shmid_ds *buf);
1.System V共享内存中的数据,从来不写入到实际磁盘文件中去;而通过mmap()映射普通文件实现的共享内存通信可以指定何时将数据写入磁盘文件中。
2.System V共享内存是随内核持续的,即使所有访问共享内存的进程都已经正常终止,共享内存区仍然存在(除非显式删除共享内存),在内核重新引导之前,对该共享内存区域的任何改写操作都将一直保留。
用来协调进程对共享资源的访问
相关函数semget,semop,semctl
所需头文件
#include <sys/types.h>
#include <sys/ipc.h>
#include <sys/sem.h>
创建一个新信号量或取得一个已有信号量,原型为:int semget(key_t key, int num_sems, int sem_flags);
参数key****:整数值
参数num_sems:指定需要的信号量数目,几乎总是1。
参数sem_flags:一组标志,信号量不存在时创建一个新的信号量,指定IPC_CREAT做按位或操作。设置了IPC_CREAT标志后,即使给出的键是一个已有信号量的键,也不会产生错误。
指定IPC_CREAT | IPC_EXCL,创建一个新的,唯一的信号量,如果信号量已存在,返回一个错误。
返回值:成功返回一个相应信号标识符(非零),失败返回-1.
操作一个或一组信号 ,原型为:
int semop(int sem_id, struct sembuf *sem_opa, size_t nsops);
semid:信号集的识别码,可通过semget获取。
sem_opa:指向存储信号操作结构的数组指针,信号操作结构的原型如下
struct sembuf{
short sem_num; //信号量集中的信号量编号0,1……
short sem_op; //信号量在一次操作中需要改变的数据,通常是两个数,一个是-1,一个是+1。
short sem_flg;//通常为SEM_UNDO,使操作系统跟踪信号并在进程没有释放该信号量而终止时,操作系统释放信号量
};
lnsops:信号量操作结构的数量,大于或等于1
该函数用来直接控制信号量信息,它的原型为
int semctl(int sem_id, int sem_num, int command, …);
第四个参数,它通常是一个union semum结构,定义如下:
union semun{
int val;
struct semid_ds *buf;
unsigned short *arry;
};
1 | int main(int argc, char *argv[]) |
1 | static int set_semvalue() |


1 |
|
每一台机器内部对变量的字节存储顺序不同,而网络传输的数据是一定要统一顺序的。所以对内部字节表示顺序与网络字节顺序(大端)不同的机器,一定要对数据进行转换
真正转换还是不转换是由系统函数自己来决定的。
头文件:include <arpa/inet.h>
unsigned short int htons(unsigned short int hostshort):
主机字节顺序转换成网络字节顺序,对无符号短型进行操作4bytes
unsigned long int htonl(unsigned long int hostlong):
主机字节顺序转换成网络字节顺序,对无符号长型进行操作8bytes
unsigned short int ntohs(unsigned short int netshort):
网络字节顺序转换成主机字节顺序,对无符号短型进行操作4bytes
unsigned long int ntohl(unsigned long int netlong):
网络字节顺序转换成主机字节顺序,对无符号长型进行操作8bytes
头文件:#include <sys/types.h>
#include <sys/socket.h>
#include <arpa/inet.h>
int inet_pton(int family, const char *strptr, void *addrptr);
转换字符串到网络地址 。 返回:1成功;-1出错
const char* inet_ntop(int family, const void *addrptr, char *strptr, size_t len);
转换网络二进制结构到ASCII类型的地址
返回:成功,指向结果的指针;出错,NULL
socket是网络编程的一种接口,它是一种特殊的I/O,用socket函数建立一个Socket连接,此函数返回一个整型的socket描述符,随后进行数据传输。
一个IP地址,一个通讯端口,就能确定一个通讯程序的位置。为此开发人员专门设计了一个套接结构,就是把网络程序中所用到的网络地址和端口信息放在一个结构体中。
一般套接口地址结构都以“sockaddr”开头。socket根据所使用的协议的不同可以分TCP套接口和UDP套接口,又称为流式套接口和数据套接口。
UDP是一个无连接协议,TCP是个可靠的端对端协议。传输UDP数据包时,LINUX不知道也不关心它们是否已经安全到达目的地,而传输TCP数据包时,则应先建立连接以保证传输的数据被正确接收。
三种类型套接字
流套接字(SOCK_STREAM)
可靠的、面向连接的通信。
使用TCP协议
数据报套接字(SOCK_DGRAM)
无连接服务
使用UDP协议
原始套接字(SOCK_RAW)
允许对底层协议如IP、ICMP直接访问
两个重要的数据类型:sockaddr和sockaddr_in,这两个结构类型都是用来保存socket信息的,如IP地址、通信端口等。
sockaddr——虚拟定义的地址(取决于协议):
1 | struct sockaddr |
sockaddr_in(AF_INET中使用的地址定义):
1 | struct sockaddr_in |

程序初始化
持续监听一个固定的端口
收到Client的连接后建立一个socket连接
与Client进行通信和信息处理
接收Client通过socket连接发送来的数据,进行相应处理并返回处理结果
通过socket连接向Client发送信息
通信结束后中断与Client的连接
程序初始化
连接到某个Server上,建立socket连接
与Server进行通信和信息处理
接收Server通过socket连接发送来的数据,进行相应处理
通过socket连接向Server发送请求信息
通信结束后中断与Server的连接

部分满足以下几点要求时,应该用UDP
面向数据报
网络数据大多为短消息
拥有大量Client
对数据安全性无特殊要求
网络负担非常重,但对响应速度要求高
例子:ICQ、视频点播
socket()的参数不同
UDP Server不需要调用listen和accept
UDP收发数据用sendto/recvfrom函数
TCP:地址信息在connect/accept时确定
UDP:在sendto/recvfrom函数中每次均需指定地址信息
UDP:shutdown函数无效
基于TCP协议的编程,其最主要的特点是建立完连接后,才进行通信。
常用的基于TCP网络编程函数及功能
头文件
#include <sys/types.h>
#include <sys/socket.h>

socket: 创建用于通信的端点并返回描述符.
int socket(int domain, int type, int protocol);
“domain” parameter
指定通信域,即选择协议族,如 AF_INET,AF_INET6 …
“type” parameter
指定通信语义。 三种主要类型: SOCK_STREAM, SOCK_DGRAM, SOCK_RAW
“protocol” parameter
usually 0 (default).
bind: binds a name to a socket
int bind(int sockfd, struct sockaddr *my_addr, socklen_t addrlen);
struct sockaddr {
sa_family_t sa_family;
char sa_data[14];
}
互联网地址操作例程
int inet_aton(const char *cp, struct in_addr *inp);
char* inet_ntoa (struct in_addr in);
inet_ntoa将一个32位数字表示的IP地址转换成点分十进制IP地址字符串
listen: listen for connections on a socket
int listen(int s, int backlog);
参数说明:
s:socket()返回的套接口文件描述符。
backlog:进入队列中允许的连接的个数。进入的连接请求在使用系统调用accept()应答之前要在进入队列中等待。这个值是队列中最多可以拥有的请求的个数。大多数系统的缺省设置为20。
accept()函数将响应连接请求,建立连接
int accept(int sockfd,struct sockaddr *addr,int *addrlen);
accept缺省是阻塞函数,阻塞直到有连接请求
sockfd: 被动(倾听)的socket描述符
如果成功,返回一个新的socket描述符(connected socket descriptor)来描述该连接。这个连接用来与特定的Client交换信息
addr将在函数调用后被填入连接对方的地址信息,如对方的IP、端口等。
connect: initiate a connection on a socket (connect to a server).
int connect(int sockfd, struct sockaddr *servaddr, int addrlen);
主动的socket
servaddr是事先填写好的结构,Server的IP和端口都在该数据结构中指定。
send/recv: 面向连接
int send(int s, const void *msg, size_t len, int flag);
s:发送数据的套接口文件描述符。
msg:发送的数据的指针
len:数据的字节长度
flag:标志设置为0。
int recv(int s, void *buf, size_t len, int flag);
s:读取的套接口文件描述符。
buf:保存读入信息的地址。
len:缓冲区的最大长度。
flag:设置为0。
int sendto(int s, const void *msg, size_t len, int flags, const struct sockaddr *to, socketlen_t tolen);
int recvfrom(int s, void *buf, size_t len, int flags, struct sockaddr *from, socklen_t *fromlen);
close
int close(int sockfd);
shutdown
int shutdown(int sockfd, int how);
how: SHUT_RD, SHUT_WR, SHUT_RDWR
shutdown直接对TCP连接进行操作,close只是对套接字描述符操作。

主要语句说明:
服务端
建立socket:socket(AF_INET, SOCK_STREAM, 0);
绑定bind:bind(sockfd,(struct sockaddr *)&my_addr,sizeof(struct sockaddr);
建立监听listen:listen(sockfd, BACKLOG);
响应客户请求:accept(sockfd,(struct sockaddr *)&remote_addr, &sin_size);
发送数据send:send(client_fd, “连接上了 \n”, 26, 0);
关闭close:close(client_fd);
客户端:
建立socket:socket(AF_INET, SOCK_STREAM, 0);
请求连接connect:connect(sockfd, (struct sockaddr *)&serv_addr, sizeof(struct sockaddr));
接收数据recv:recv(sockfd, buf, MAXDATASIZE, 0);
关闭close:close(sockfd);
1 | //服务端源程序代码 |
基于UDP协议的编程,其最主要的特点是不需要用函数bind把本地IP地址与端口号进行绑定,也能进行通信。
常用的基UDP网络编程函数及功能:


主要语句说明:
服务端:
建立socket:socket(AF_INET,SOCK_DGRAM,0)
绑定bind:bind(sockfd,(struct sockaddr *)&adr_inet,sizeof(adr_inet));
接收数据recvfrom:recvfrom(sockfd,buf,sizeof(buf),0,(struct sockaddr *)&adr_clnt,&len);
关闭close:close(sockfd);
客户端:
建立socket:socket(AF_INET, SOCK_STREAM, 0);
读取liu文件:fopen(“liu”,”r”);
发送数据sendto:sendto(sockfd,buf,sizeof(buf),0,(struct sockaddr *)&adr_srvr,sizeof(adr_srvr));
关闭close:close(sockfd);
1 | //服务端源程序代码: |
I/O Models
Block mode 阻塞模式
Non-block mode 非阻塞模式
I/O multiplexing I/O多路复用
多进程并发
多线程并发
阻塞方式:在数据通信中,当服务器运行函数accept() 时,假设没有客户机连接请求到来,那么服务器就一直会停止在accept()语句上,等待客户机连接请求到来,出现这样的情况就称为阻塞。
阻塞与非阻塞方式的比较
errno - EWOULDBLOCK
非阻塞的实现
int flags;
if ( (flags=fcntl(sock_fd, F_GETFL, 0)) < 0)
err_sys();
flags |= O_NONBLOCK;
if ( fcntl(sock_fd, F_SETFL, flags) < 0)
err_sys();
基本思想:
先构造一张有关描述符的表,然后调用一个函数(如select),该函数到这些描述符中的一个已准备好进行I/O时才返回,返回时告诉进程哪个描述符已准备好进行I/O.
select: synchronous I/O multiplexing.
#include <sys/select.h>
int select(int n, fd_set *readfds, fd_set *writefds, fd_set *exceptfds, struct timeval *timeout);
FD_ZERO(fd_set *set);
FD_SET(int fd, fd_set *set);
FD_CLR(int fd, fd_set *set);
FD_ISSET(int fd, fd_set *set);

1 | listenfd = socket(...); |


vi/vim编辑器有三种工作模式,每种工作模式都有不同的作用,以下是这三种工作模式的详细介绍:
vi/vim的命令,例如: 退出命令、保存内容命令等等。从该模式可以切换为命令模式。注意: 启动vi/vim后,首先进入的是命令模式。
首先启动vi/vim编辑器后,首先进入的工作模式是命令模式,在当前模式下,我们只能查看文件内容,不能对文件内容进行写入操作。如果想对文件进行写入操作,那么我们只有进入插入模式下。
| 输入命令 | 说明 |
|---|---|
| i, I | i 为『从目前光标所在处输入』,I 为『在目前所在行的第一个非空格符处开始输入』。 |
| a, A | a 为『从目前光标所在的下一个字符处开始输入』, A 为『从光标所在行的最后一个字符处开始输入』。 |
| o, O | 这是英文字母 o 的大小写。o 为『在目前光标所在的下一行处输入新的一行』; O 为在目前光标所在处的上一行输入新的一行。 |
ESC键即可返回到命令模式。案例演示1:
使用vi/vim编辑器打开文件testFile,并且将工作模式切换到插入模式,输入Hello vi/vim字符串,最后保存文件并退出,可以使用如下命令:
1 | vi testFile` 或 `vim testFile |
打卡testFile文件命令;
首先进入的是命令模式;
按下字母i后进入插入模式;
输入Hello vi/vim字符后,按下ESC键后返回命令模式,最后输入:wq保存退出文件; [请在右侧“命令行”里直接体验]
vi/vim底线命令模式下如何执行写复杂的命令,例如我们常用的保存退出命令(wq)等。
:字符即可,注意:是英文输入法下的冒号。ESC键即可返回到命令模式。在vi/vim命令模式下,我们可以对文件进行删除、复制和粘贴操作。
vi/vim编辑器与其它编辑器最大的不同之处是不能使用鼠标进行操作(可以在配置文件中设置鼠标属性,默认是禁止使用鼠标),我们可以在命令模式下移动光标位置,常见移动命令如下所示:
| 命令 | 说明 |
|---|---|
| h 或 向左箭头键(←) | 光标向左移动一个字符 |
| j 或 向下箭头键(↓) | 光标向下移动一个字符 |
| k 或 向上箭头键(↑) | 光标向上移动一个字符 |
| l 或 向右箭头键(→) | 光标向右移动一个字符 |
| [Ctrl] + [f] | 屏幕『向下』移动一页,相当于 [Page Down]按键 |
| [Ctrl] + [b] | 屏幕『向上』移动一页,相当于 [Page Up] 按键 |
| [Ctrl] + [d] | 屏幕『向下』移动半页 |
| [Ctrl] + [u] | 屏幕『向上』移动半页 |
案例演示1:
使用vi/vim编辑器打开文件oldFile,移动当前光标到第一行的第二字符处,可以使用如下步骤:
打卡oldFile文件命令;
首先进入的是命令模式;
移动光标到第一行的第5个字符处(按5次→);
最后输入:q退出文件; [请在右侧“命令行”里直接体验]
我们不光可以在插入模式下可以对文件内容进行删除操作,我们可以直接在命令模式下对文件进行删除操作,常见删除命令如下所示:
| 命令 | 说明 |
|---|---|
| x, X | 在一行字当中,x 为向后删除一个字符 (相当于 [del] 按键), X 为向前删除一个字符(相当于 [backspace] 亦即是退格键) |
| nx | n 为数字,连续向后删除 n 个字符。例如,我要连续删除 5 个字符 ,则可以使用5x |
| dd | 删除光标所在的那一整行 |
| ndd | n 为数字。删除光标所在的向下 n 行,例如10dd则是删除 10 行 |
| d1G | 删除光标所在到第一行的所有数据 |
| dG | 删除光标所在到最后一行的所有数据 |
案例演示1:
使用vi/vim编辑器打开文件oldFile,删除当前文件的第二行所有内容,最后保存文件并退出,可以使用如下步骤:
打卡oldFile文件命令;
首先进入的是命令模式;
移动光标到文件第二行;
输入dd字符后删除当前行内容,最后输入:wq保存退出文件; [请在右侧“命令行”里直接体验]
常见复制命令如下所示:
| 命令 | 说明 |
|---|---|
| yy | 复制光标所在的那一行 |
| nyy | n 为数字。复制光标所在的向下 n 行,例如 10yy 则是复制 10 行 |
| y1G | 复制光标所在行到第一行的所有数据 |
| yG | 复制光标所在行到最后一行的所有数据 |
| y0 | 复制光标所在的那个字符到该行行首的所有数据 |
| y$ | 复制光标所在的那个字符到该行行尾的所有数据 |
常见粘贴命令为p, P,p 为将已复制的数据在光标下一行贴上,P 则为贴在游标上一行!
案例演示1:
使用vi/vim编辑器打开文件oldFile,将第一行内容复制,然后粘贴到文件的末尾,最后保存文件并退出,可以使用如下步骤:
打卡oldFile文件命令;
首先进入的是命令模式;
复制第一行内容(yy),移动光标到最后一行,粘贴(p)内容到当前行的下一行,最后输入:wq保存退出文件; [请在右侧“命令行”里直接体验]
vi/vim编辑器在底线命令模式下可以对文件内容进行查找和替换操作,常见查找和替换命令如下所示:
| 命令 | 说明 |
|---|---|
| /word | 向光标之下寻找一个名称为 word 的字符串。例如要在档案内搜寻 vbird 这个字符串,就输入 /vbird 即可。 |
| ?word | 向光标之上寻找一个字符串名称为 word 的字符串。 |
| n | 这个 n 是英文字母。代表重复前一个搜寻的动作。举例来说, 如果刚刚我们执行 /vbird 去向下搜寻 vbird 这个字符串,则按下 n 后,会向下继续搜寻下一个名称为 vbird 的字符串。 |
| N | 这个 N 是英文按键。与 n 刚好相反,为『反向』进行前一个搜寻动作。 例如 /vbird 后,按下 N 则表示『向上』搜寻 vbird 。 |
| [:n1,n2s/word1/word2/g | n1 与 n2 为数字。在第 n1 与 n2 行之间寻找 word1 这个字符串,并将该字符串取代为 word2 。 |
| :1,$s/word1/word2/g | 从第一行到最后一行寻找 word1 字符串,并将该字符串取代为 word2。 |
| :1,$s/word1/word2/gc | 从第一行到最后一行寻找 word1 字符串,并将该字符串取代为 word2 !且在取代前显示提示字符给用户确认 (confirm) 是否需要取代。 |
案例演示1:
使用vi/vim编辑器打开文件oldFile,将所有line单词替换为words单词,并保存退出,可以使用如下步骤:
打卡oldFile文件命令;
首先进入的是命令模式;
首先输入:切换当前模式为底线命令模式,然后输入1,$s/line/words/g后回车;
[请在右侧“命令行”里直接体验]
常见在底线命令模式执行的命令如下所示:
| 命令 | 说明 |
|---|---|
| :w | 将编辑的数据写入硬盘档案中 |
| :w! | 若文件属性为『只读』时,强制写入该档案。不过,到底能不能写入, 还是跟你对该档案的档案权限有关啊! |
| :q! | 若曾修改过档案,又不想储存,使用 ! 为强制离开不储存档案。 |
| :w [filename] | 将编辑的数据储存成另一个档案(类似另存新档) |
| :n1,n2 w [filename] | 将 n1 到 n2 的内容储存成 filename 这个档案。 |
| :! command | 暂时离开 vi 到指令行模式下执行 command 的显示结果! |
| :set nu | 显示行号,设定之后,会在每一行的前缀显示该行的行号 |
| :set nonu | 与 set nu 相反,为取消行号! |
案例演示1:
使用vi/vim编辑器打开文件oldFile,显示当前文件行号,将当前文件的第1-3行内容另存为oldFileCpy文件,使用cat命令查看新生成文件内容,可以使用如下步骤:
打卡oldFile文件命令;
输入:set nu后回车,显示行号;
输入:1,3 w oldFileCpy后回车
最后在vi中使用cat命令查看新生成的文件oldFileCpy内容;
按下回车键后返回当前vi编辑器,最后输入q退出文件; [请在右侧“命令行”里直接体验]
在实际的软件开发时, 应该遵守一个基本原则:不要重复造轮子。如果某些代码经常要用到,不仅这个项目能使用,而且也能复用到其它项目上,那么就应该把这部分代码从项目中分离出来,将其编译为库文件,供需要的程序调用。
程序库分为两类,分别是静态库和动态库。本关将主要讲解如何生成静态库。
Windows系统上的静态库是以.lib为后缀,而Linux系统上的静态库是以.a为后缀的特殊的存档。
Linux系统的标准系统库可在目录/usr/lib与/lib中找到。比如,在类Unix系统中C语言的数序库一般存储为文件/usr/lib/libm.a。该库中函数的原型声明在头文件/usr/include/math.h中。
在Linux下,我们可以使用gcc和ar工具制作和使用自己的静态库,具体过程如下:
1 | 将源码文件编译成.o目标文件; |
注意Linux系统上默认的静态库名格式为:libxxx.a,其中xxx为生成库的名称。
案例演示1:
编写一个函数printHello,其功能为打印“Hello world”字符串,将其编译生成名为Hello的静态库,可以使用如下命令:
1 | vim printHello.h |
vim编写printHello.h(声明printHello函数,方便以后被其它程序调用)1 | #ifndef __PRINTHELLO_H__ |
vim编写printHello.c1 |
|
[请在右侧“命令行”里直接体验]
静态库的使用方法只需要在编译程序的时候指明要链接的库名称即可,gcc中有两个参数是关于链接库时所使用的,**分别是:-L和-l**。
1 | -L:用于告诉gcc要链接的库所在目录; |
案例演示1:
调用以上案例生成的printHello函数,可以使用如下命令:
1 | vim main.c |
vim编写main.c1 |
|
[请在右侧“命令行”里直接体验]
| 静态库 | 动态库 | |
|---|---|---|
| 名称 | 命名方式是”libxxx.a”,库名前加”lib”,后缀用”.a”,”xxx”为静态库名 | 命名方式是”libxxx.so”, 库名前加”lib”,后缀用”.so”, “xxx”为动态库名 |
| 链接时间 | 静态库的代码是在编译过程中被载入程序中 | 动态库在编译的时候并没有被编译进目标代码,而是当你的程序执行到相关函数时才调用该函数库里的相应函数 |
| 优点 | 在编译后的执行程序不在需要外部的函数库支持,因为所使用的函数都已经被编进去了。 | 动态库的改变并不影响你的程序,所以动态函数库升级比较方便 |
| 缺点 | 如果所使用的静态库发生更新改变,你的程序必须重新编译 | 因为函数库并没有整合进程序,所以程序的运行环境必须提供相应的库 |
Windows系统上的动态库是以.dll为后缀,而Linux系统上的动态库是以.so为后缀的特殊的存档。
在Linux下,我们可以使用gcc制作和使用动态库,具体制作过程如下:
1 | 使用gcc命令加-fPIC参数将源码文件编译成.o目标文件;使用gcc命令加-shared参数将多个目录文件生成一个动态库文件; |
注意Linux系统上默认的动态库名格式为:libxxx.so,其中xxx为生成库的名称。
案例演示1:
编写一个函数printHello,其功能为打印”Hello world”字符串,将其编译生成名为Hello的动态库,可以使用如下命令:
1 | vim printHello.h |
vim编写printHello.h(申明printHello函数,方便以后被其它程序调用)1 |
|
vim编写printHello.c1 |
|
[请在右侧“命令行”里直接体验]
动态库的使用方法与静态库使用方式略有不同,除了使用gcc中的-L和-l参数外,想要调用动态库还需要更新Linux系统中/etc/ld.so.cache或者修改LD_LIBRARY_PATH环境变量,否则在运行程序的时候会报”No such file or directory”错误。
案例演示1:
调用以上案例生成的printHello函数,可以使用如下命令:
1 | vim main.c |
[使用
vim编写程序]
[请在右侧“命令行”里直接体验]
此时编译正常,当运行的时候会报”No such file or directory”错误。
/etc/ld.so.conf配置文件,然后加入需要加载的动态库目录。ldconfig更新/etc/ld.so.cache案例演示1:
更新/etc/ld.so.cache,然后运行上一个案例生成的exe,可以使用如下命令:
1 | sudo vim /etc/ld.so.conf |
[使用
vim向/etc/ld.so.conf文件添加/home/fzm路径]
[请在右侧“命令行”里直接体验]
LD_LIBRARY_PATH环境变量在运行可执行文件前修改LD_LIBRARY_PATH变量为可执行程序指定需要加载的动态库路径。
案例演示1:
修改LD_LIBRARY_PATH,然后运行上一个案例生成的exe,可以使用如下命令:
1 | LD_LIBRARY_PATH=. ./exe |
[请在右侧“命令行”里直接体验]
注意:
1 | LD_LIBRARY_PATH告诉了exe程序现在当前目录下寻找链接的动态库; |
什么是makefile?或许很多Winodws的程序员都不知道这个东西,因为那些Windows的IDE都为你做了这个工作,但是要作一个专业的程序员,makefile还是要懂的。makefile其实就是描述了整个工程中所有文件的编译顺序,编译规则,并且由make命令来读取makefile文件,然后根据makefile文件中定义的规则对其进行解析,完成对整个项目的编译操作。
makefile在linux操作系统中是比较常见的,例如,我们在使用源码安装一个软件的时候,通常只需执行make命令即可完成对软件的编译,正是因为软件开发者已经编写了makefile文件,所以只需执行make命令就会完成对整个工程的自动编译。
本关将介绍makefile的语法,使用makefile来完成对软件的编译。
makefile文件中包含了一组用来编译应用程序的规则,一项规则可分成三个部分组成:
1 | 工作目标(target) |
格式为:
1 | target : prereq1 prereq2 |
以上格式就是一个文件的依赖关系,也就是说,target这个目标文件依赖于多个prerequisites文件,其生成规则定义在commands中。说白一点就是说,prerequisites中如果有一个以上的文件比target文件要新的话,commands所定义的命令就会被执行。这就是Makefile的规则。也就是Makefile中最核心的内容。
注意
1 | commands前面使用的是TAB键,而不是空格,使用空格会出现错误; |
案例演示1:
存在一个源码文件main.c文件,编译一个makefile规则来编译该文件,并生成一个名为HelloWorld的可执行文件,具体操作如下:
1 | vim makefile |
vim编写如下代码1 |
|
vim编写makefile1 | HelloWorld : main.c |
[请在右侧“命令行”里直接体验]
通过以上案例可以看到,编写好makefile后,只需要输入make命令即自动只需定义好的规则。
注意:gcc -o HelloWorld main.c命令前是TAB键而不是空格。
案例演示2:
假设一个项目中包含5个源码文件,分别是Add.c、Sub.c、Mul.c、Div.c和main.c和一个头文件def.h,编译一个makefile规则来编译该项目,并生成一个名为exe的可执行文件,具体操作如下:
1 | vim makefile |
1 |
|
1 |
|
1 |
|
1 |
|
1 |
|
1 |
|
1 | exe : main.o Add.o Sub.o Mul.o Div.o |
[请在右侧“命令行”里直接体验]
以上案例,当只需make命令时,首先解析目标为exe的规则,然后发现exe依赖于main.o、Add.o和Sub.o,然后分别对main.o、Add.o和Sub.o规则进行解析,即分别执行目标为main.o、Add.o和Sub.o的命令。当main.o、Add.o和Sub.o生成后,最后执行exe对应的命令。
makefile 变量的命令可以包含字符、数字、下划线(可以是数字开头),并且大小写敏感。
makefile变量在声明时需要对其进行赋值,而在使用该变量时需要在变量名前加上**$符号 例如$(VARNAME),如果用户需要在makefile文件中使用真实的$字符,则使用$$**表示。
makefile中对变量的赋值方式有三种,分别是:
1 | 递归赋值(=):递归赋值,即赋值后并不马上生效,等到使用时才真正的赋值,此时通递归找出当前的值;直接赋值(:=):是将":="右边中包含的变量直接展开给左边的变量赋值;条件赋值(?=):只有此变量在之前没有赋值的情况下才会对这个变量进行赋值,所有一般用在第一次赋值; |
makefile除了可以自定义变量外,还存在一些系统默认的特殊变量,这些特殊变量可以方便帮助我们快速的编写makefile文件,例如:$@、$<和$^等等。
本关将介绍makefile的变量的定义和使用方法,以及使用特殊变量来编写makefile文件。
自定义变量格式:
变量名 = 变量内容变量名 := 变量内容变量名 ?= 变量内容变量的使用格式为: $变量名或者${变量名}或者$(变量名)
案例演示1:
在上一关中案例2中的项包含了5个源码文件和一个头文件,如果使用变量来编写makefile则会显示出比较简洁的格式,具体操作如下:
1 | vim makefilemake |
1 | object=main.o Add.o Sub.o Mul.o Div.o |
[
makefile内容]
[请在右侧“命令行”里直接体验]
可以看到,我们使用object来表示main.o Add.o Sub.o Mul.o Div.o,这样我们就可以使用$(object)来表示以上目标文件,而不是每次输入这5个目标文件。
makefile常用的特殊变量有:
1 | $@:表示所有目标; |
案例演示1:
接着上一个案例中的项目,如果使用特殊变量来编写makefile则会显示出更加简洁的格式,具体操作如下:
1 | vim makefile |
1 | object=main.o Add.o Sub.o Mul.o Div.o |
[请在右侧“命令行”里直接体验]
make很强大,它可以自动推导文件以及文件依赖关系后面的命令,于是我们就没必要去在每一个.o文件后都写上类似的命令。因为,我们的make会自动识别,并自己推导命令。
只要make看到一个.o文件,它就会自动的把.c文件加在依赖关系中,如果make找到一个main.o,那么main.c就会是main.o的依赖文件。并且 gcc -c main.c 也会被推导出来,于是,我们的makefile再也不用写得这么复杂。
本关将介绍makefile的自动推导功能。
自动推导格式: 目标 : 其它依赖
案例演示1:
如果使用自动推导模式来编写上一关卡案例中的makefile,则会有更简洁的格式,具体操作如下:
1 | vim makefile |
1 | object=main.o Add.o Sub.o Mul.o Div.o |
[请在右侧“命令行”里直接体验]
可以看到,我们只需要为main.o创建一个编译规则,其4个目标文件则不需要为其创建编译规则,因为make会自动的为其构造出编译规则。
每个Makefile中都应该写一个清空目标文件(.o和执行文件)的规则,这不仅便于重编译,也很利于保持文件的清洁。
通常,我们在使用源码安装软件的时候,都会在编译完软件后,执行make install这个命令来安装软件,或者执行make clean这个命令清空临时生成的目标文件。以上操作就是利用了makefile的伪目标。
本关将介绍makefile的伪目标。
makefile使用.PHONY`关键字来定义一个伪目标,具体格式为:
1 | .PHONY : 伪目标名称 |
案例演示1:
为上一关卡案例中的makefile添加清空临时目标文件标签clean,具体操作如下:
1 | vim makefile |
1 | object=main.o Add.o Sub.o Mul.o Div.o |
[请在右侧“命令行”里直接体验]
可以看到,当我们执行完make命令后会生成多个临时文件,然后我们执行make clean命令后,则会将生成的临时文件删除掉,其实执行make clean命令就是在执行rm main.o Add.o Sub.o Mul.o Div.o。
案例演示2:
使用另一个格式来清除临时产生的目录文件和不显示删除命令,具体操作如下:
1 | vim makefile |
1 | object=main.o Add.o Sub.o Mul.o Div.o |
[请在右侧“命令行”里直接体验]
可以看到,当我们执行make clean命令后,将不会在终端中显示rm main.o Add.o Sub.o Mul.o Div.o命令。
注意:在命令前加了**@**符号,则不会把命令原样输出在终端。
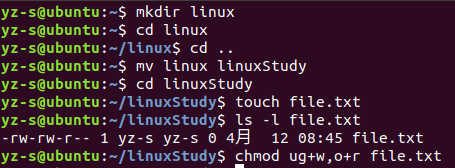
在当前目录中新建文件test.txt
touch test.txt
增加拥有者(u)对该文件的执行权限。
chmod 777 test.txt
增加群组用户(g)对该文件的写权限。
chmod ug+w test.txt
取消其他用户(o)对该文件的读权限。
chmod o-r test.txt
文件的创建操作是 I/O 操作的第一步。在Linux系统中creat系统调用可以实现对文件的创建。本关只介绍文件创建函数的使用方法。
在Linux系统中可以使用man命令来查询这些函数的使用方法。具体的查询命令为: man 2 函数名 其中,2表示查找系统调用函数,关于文件的创建、打开和关闭函数都是系统调用函数,因此使用2作为man命令的第一个参数。
案例演示1: 查询creat函数的使用方法可以使用以下命令: man 2 creat
[查询结果]
通过man命令可以查询常用的系统调用函数的使用方法。
创建文件的系统调用函数是creat,具体的说明如下:
需要的头文件如下:
1 | #include <sys/types.h> |
函数格式如下:
1 | int creat (const char *pathname,mode_t mode); |
参数说明:
1 | pathname:需要创建文件的绝对路径名或相对路径名;mode:用于指定所创建文件的权限; |
常见的
1 | mode |
取值及其含义见下表所示:
| mode | 含义 |
|---|---|
| S_IRUSR | 文件所有者的读权限位 |
| S_IWUSR | 文件所有者的写权限位 |
| S_IXUSR | 文件所有者的执行权限位 |
| S_IRGRP | 所有者同组用户的读权限位 |
| S_IWGRP | 所有者同组用户的写权限位 |
| S_IXGRP | 所有者同组用户的执行权限位 |
| S_IROTH | 其他用户的读权限位 |
| S_IWOTH | 其他用户的写权限位 |
| S_IXOTH | 其他用户的执行权限位 |
-1并设置错误编号errno。案例演示1: 在当前目录下使用creat函数创建一个名为firstFile的文件,并设置文件的权限为644。详细代码如下所示:
1 |
|
将以上代码保存为
main.c文件中,编译执行。可以看到当前目录下存在firstFile文件,并且其权限为644。
本关的编程任务是补全右侧代码片段中Begin至End中间的代码,具体要求如下:
testFile的文件,并设置其权限为651。1 |
|
文件的打开与关闭操作是 I/O 操作的第二步。在Linux系统中提供了以下两个系统调用函数用于打开和关闭文件操作,分别是open和close。本关将介绍文件的打开和关闭函数的使用方法。
使用man 2 函数名也可以查询这些函数的使用方法。
打开文件的系统调用函数是open,具体的说明如下:
需要的头文件如下:
1 | #include <sys/types.h>#include <sys/stat.h>#include <fcntl.h> |
函数格式如下:
1 | int open(coust char *pathname, int flags);int open(const char *pathname, int flags, made_t mode); |
参数说明:
1 | pathname:需要被打开或创建的文件绝对路径名或相对路径名;flags:用于描述文件的打开方式;mode:用于指定所创建文件的权限(与上一关中creat函数中mode取值一致); |
第一个open函数用于打开已经存在的文件。而第二个open函数可以创建一个不存在的文件且打开,该函数将flags参数设置为O_CREAT | O_WRONLY | O_TRUNC时等同于上一关中的creat函数。
常见的flags取值及其含义见下表所示:
| flags | 含义 |
|---|---|
| O_RDONLY 以只读方式打开文件 | |
| O_WRONLY | 以只写方式打开文件 |
| O_RDWY | 以只读写方式打开文件 |
| O_CREAT | 若所打开文件不存在则创建此文件 |
| O_TRUNC | 若以只写或读写方式打开一个已存在文件时,将该文件截至 0 |
| O_APPEND | 向文件添加内容时将指针置于文件的末尾 |
| O_SYNC | 只在数据被写外存或其他设备之后操作才返回 |
-1并设置错误编号errno。案例演示1: 在当前目录下使用open函数以只读方式打开一个已存在且名为firstFile的文件。详细代码如下所示:
1 |
|
将以上代码保存为
openFile.c文件中,编译执行。
案例演示2: 在当前目录下使用open函数创建一个名为secondFile的文件,并设置文件的权限为644。详细代码如下所示:
1 |
|
将以上代码保存为
secondFile.c文件中,编译执行。可以看到当前目录下存在secondFile文件,并且其权限为644。
关闭文件的系统调用函数是close,具体的说明如下:
需要的头文件如下:
1 | #include <unistd.h> |
函数格式如下: int close(int fd);
参数说明:
1 | fd:需关闭文件的描述符; |
errno。案例演示1: 在当前目录下使用close函数关闭一个已经被打开的文件。详细代码如下所示:
1 |
|
将以上代码保存为
closeFile.c文件中,编译执行。
本关的编程任务是补全右侧代码片段中Begin至End中间的代码,具体要求如下:
open_File函数,使其以读方式打开一个文件,并返回文件描述符fd。close_File函数,使其关闭一个已经被打开的文件。1 |
|
文件的读写是 I/O 操作的核心内容。上一关中已经介绍了如何打开和关闭一个文件,但是要实现文件的 I/O 操作就必须对其进行读写,文件的读写操作所用的系统调用分别是read和write。本关将介绍文件的读写函数的使用方法。
使用man 2 函数名也可以查询这些函数的使用方法。
写入文件的系统调用函数是write,具体的说明如下:
需要的头文件如下:
1 | #include <unistd.h> |
函数格式如下: ssize_t write(int fd, void *buf, size_t count);
参数说明:
1 | fd:表示将对之进行写操作的文件打开时返回的文件描述符;buf:指向存放将写入文件的数据的缓冲区的指针;count:表示本次操作所要写入文件的数据的字节数; |
-1并设置错误编号errno。案例演示1: 在当前目录下往firstFile文件中写入一个字符串。详细代码如下所示:
1 |
|
将以上代码保存为
writeFile.c文件中,编译执行。可以看到字符串被写入到firstFile文件中。
读取文件的系统调用函数是read,具体的说明如下:
需要的头文件如下:
1 | #include <unistd.h> |
函数格式如下: ssize_t read(int fd, void *buf, size_t count);
参数说明:
1 | fd:表示将对之进行写操作的文件打开时返回的文件描述符;buf:指向存放所读数据的缓冲区的指针;count:读操作希望读取的字节数; |
-1并设置错误编号errno。案例演示1: 读取当前目录下firstFile文件中的前4个字符。详细代码如下所示:
1 |
|
将以上代码保存为
readFile.c文件中,编译执行。可以看到从firstFile文件中读取出了前4个字符。
本关的编程任务是补全右侧代码片段中Begin至End中间的代码,具体要求如下:
write_File函数,完成向文件写入字符串功能。并返回实际写入字符个数。readLine函数,完成从文件中读取一行的功能(不包括换行符),并返回实际读取的字符个数(文件的换行符号为\n)。1 |
|
当不需要一个文件时,我们通常直接选中文件按下delete键对其删除,本关将介绍如何在Linux系统中使用C语言删除一个已经存在的文件。
在Linux系统中使用unlink和remove系统调用可以实现对文件的删除操作。
使用man 2 函数名或者man 3 函数名也可以查询这些函数的使用方法。
删除文件的系统调用函数是unlink,具体的说明如下:
需要的头文件如下:
1 | #include <unistd.h> |
函数格式如下: int unlink(const char *pathname); 参数说明:
1 | pathname:需要删除的文件绝对路径名或相对路径名; |
函数返回值说明: 调用成功时,返回值为0;调用失败时,返回值为-1并设置错误编号errno。
案例演示1: 删除当前目录下的firstFile文件。详细代码如下所示:
1 |
|
将以上代码保存为
deleteFile1.c文件中,编译执行。可以看到当前目录下存在firstFile文件被删除了。
remove是删除文件的另一个函数,该函数是C语言的库函数,其本质是通过调用系统调用unlink来完成文件的删除操作,具体的说明如下:
需要的头文件如下:
1 | #include <stdio.h> |
函数格式如下: int remove(const char *pathname); 参数说明:
1 | pathname:需要删除的文件绝对路径名或相对路径名; |
函数返回值说明: 调用成功时,返回值为0;调用失败时,返回值为-1并设置错误编号errno。
案例演示1: 删除当前目录下的secondFile文件。详细代码如下所示:
1 |
|
将以上代码保存为
deleteFile2.c文件中,编译执行。可以看到当前目录下存在secondFile文件被删除了。
本关的编程任务是补全右侧代码片段中Begin至End中间的代码,具体要求如下:
testFile文件。1 |
|
目录文件是Linux系统中一类比较特殊的文件。它对构成 Linux 系统的整个文件系统结构非常重要。Linux系统提供了两个系统调用函数来实现目录的创建和删除功能,分别是mkdir和rmdir函数,这两个函数的名称和创建/删除目录命令的名称一样。其实创建/删除目录命令的背后实现方法就是调用这两个系统函数来实现对目录的创建和删除功能。
在Linux系统中可以使用man命令来查询这些函数的使用方法。具体的查询命令为: man 2 函数名 其中,2表示查找系统调用函数,关于目录的创建、打开、关闭和删除函数都是系统调用函数,因此使用2作为man命令的第一个参数。
案例演示1: 查询mkdir函数的使用方法可以使用以下命令: man 2 mkdir
[查询结果]
通过man命令可以查询rmdir函数的使用方法。
创建目录文件的系统调用函数是mkdir,具体的说明如下:
需要的头文件如下:
1 | #include <sys/type.h>#include <sys/stat.h> |
函数格式如下:
1 | int mkdir(const char *pathname, mode_t mode); |
参数说明:
1 | pathname:新创建的目录文件名;mode:用于指定所创建目录文件的权限; |
常见的
1 | mode |
取值及其含义见下表所示:
| mode | 含义 |
|---|---|
| S_IRUSR | 目录所有者的读权限位 |
| S_IWUSR | 目录所有者的写权限位 |
| S_IXUSR | 目录所有者的执行权限位 |
| S_IRGRP | 所有者同组用户的读权限位 |
| S_IWGRP | 所有者同组用户的写权限位 |
| S_IXGRP | 所有者同组用户的执行权限位 |
| S_IROTH | 其他用户的读权限位 |
| S_IWOTH | 其他用户的写权限位 |
| S_IXOTH | 其他用户的执行权限位 |
注意:在Linux系统中,新创建目录的权限位是(mode & ~ umask & 01777),也就是umask为进程创建目录的权限位限制。因此会出现用户在代码中设定的权限与实际创建出来的权限不一致情况。同理,对于文件权限的处理也一样。
0;调用失败时,返回值为-1并设置错误编号errno。案例演示1: 在当前目录下使用mkdir函数创建一个名为firstDir的目录文,并设置目录的权限为644。详细代码如下所示:
1 |
|
将以上代码保存为
createDir.c文件,编译执行。可以看到当前目录下存在firstDir目录文件,并且其权限为644。
删除目录文件的系统调用函数是rmdir,具体的说明如下:
需要的头文件如下:
1 | #include <unistd.h> |
函数格式如下:
1 | int rmdir(const char *pathname); |
参数说明:
1 | pathname:要被删除的目录文件名称; |
注意:使用rmdir库函数删除的目录必须为空,如果该目录不为空,则必须删除该目录的所有文件(.和..文件除外)。
0;调用失败时,返回值为-1并设置错误编号errno。案例演示1: 使用mkdir函数删除当前目录下名为firstDir的目录文件。详细代码如下所示:
1 |
|
将以上代码保存为
deleteDir.c文件中,编译执行。可以看到当前目录下的firstDir目录文件被删除。
本关的编程任务是补全右侧代码片段中Begin至End中间的代码,具体要求如下:
testDir的目录,并设置其权限为651。Dir的空目录文件。1 |
|
在Linux系统中提供了以下两个系统调用函数用于打开和关闭目录操作,分别是opendir和closedir,这些库函数不属于系统调用,它们是C语言提供的库函数。本关将介绍目录的打开和关闭函数的使用方法。
因为这两个函数是C语言提供的库函数,因此可以使用man 3 函数名也可以查询这些函数的使用方法。
打开目录文件的库函数是opendir,具体的说明如下:
需要的头文件如下:
1 | #include <sys/types.h>#include <dirent.h> |
函数格式如下: DIR *opendir(const char *name);
参数说明:
1 | name:需要打开的目录绝对路径名或相对路径名; |
注意:打开一个目录后返回一个DIR对象,该对象指向被打开目录的目录流。
NULL的空指针,并设置错误编号errno。案例演示1: 使用opendir函数打开当前用户的家目录(本实验环境的用户家目录为/home/fzm)。详细代码如下所示:
1 |
|
将以上代码保存为
openDir.c文件中,编译执行。
关闭目录文件的库函数是closedir,具体的说明如下:
需要的头文件如下:
1 | #include <sys/types.h>#include <dirent.h> |
函数格式如下: int closedir(DIR *dirp);
参数说明:
1 | dirp:需要被关闭的目录流指针; |
0;调用失败时,返回值为-1,并设置错误编号errno。案例演示1: 使用closedir函数关闭一个已经被打开的目录。详细代码如下所示:
1 |
|
将以上代码保存为
closeDir.c文件中,编译执行。
本关的编程任务是补全右侧代码片段中Begin至End中间的代码,具体要求如下:
补全open_Dir函数,使其打开一个目录并返回目录流指针dirp。
补全close_Dir函数,使其关闭一个被打开的目录。
1 |
|
ls命令的背后实现方法就是通过打开被浏览的目录,然后从目录中读取目录项。Linux系统中使用readdir函数可以读取目录内容。本关将介绍目录的读函数的使用方法。
因为readdir函数是C语言提供的库函数,因此可以使用man 3 函数名来查询该函数的使用方法。
读取目录的库调用函数是readdir,具体的说明如下:
需要的头文件如下:
1 | #include <dirent.h> |
函数格式如下: struct dirent *readdir(DIR *dirp);
参数说明:
1 | dirp:表示被打开目录的流指针; |
结构dirent指向目录项,其定义在Linux系统中的<dirent.h>头文件中,详细定义如下所示:
1 | struct dirent { |
其中d_name字段存放着所读取到的目录项名。d_type字段为该目录项的类型,常见类型如下所示:
1 | DT_DIR:目录文件;DT_LNK:符号链接文件;DT_REG:常规文件;DT_SOCK:sock文件;DT_UNKNOWN:未知的文件类型; |
注意:d_type字段并不是支持所有的文件系统,并且只是由BSD衍生出来的Linux系统中可用。在Linux系统中还提供了另一个系统调用函数用来判断文件类型,其名称为stat,有兴趣的学生可以执行去学习其使用方法。
-1并设置错误编号errno。案例演示1: 读取当前目录下的所有内容,并打印出其名称。详细代码如下所示:
1 |
|
将以上代码保存为
readdir.c文件中,编译执行。可以看到执行该命令后会将当前目录下所有的内容都打印出来。
案例演示2: 读取当前目录下的所有普通文件,并打印出其名称。详细代码如下所示:
1 |
|
将以上代码保存为
readRegDir.c文件中,编译执行。可以看到执行该命令后只会将当前目录下常规文件打印出来了。
本关的编程任务是补全右侧代码片段中Begin至End中间的代码,具体要求如下:
scanAll函数,完成读取一个目录下所有的内容,并将每个内容按空格分割打印出来。scanDir函数,完成读取一个目录下直接包含的目录名称(只读取当前目录层的内容,不往下读取),并将每个目录按空格分割打印出来。1 |
|
在 Linux 环境下,进程是一个十分重要的概念。每个进程都由一个唯一的标识符来表示,即进程 ID ,通常称为 pid 。
Linux 系统中存在一个特殊的进程,即空闲进程( idle process ),当没有其他进程在运行时,内核所运行的进程就是空闲进程,它的 pid 为 0 。在启动后,内核运行的第一个进程称为 init 进程,它的 pid 是 1 。通常, Linux 系统中 init 进程就是我们在资源管理器中看到的名为 init 的程序。系统中其它的进程都是由 init 来创建出来的。
创建新进程的那个进程被称为父进程,而新创建的进程被称为子进程。每个进程都是由其他进程创建的(除了 init 进程),因此每个子进程都有一个父进程。
Linux 系统提供了两个系统调用函数来获取一个进程的 pid 和其父进程的 pid ,分别是 getpid 和 getppid 函数。在 Linux 系统中可以使用 man 命令来查询这些函数的使用方法。具体的查询命令为:
1 | man 2 函数名 |
获取进程本身的进程 ID 的系统调用函数是 getpid ,具体的说明如下:
1 | #include <sys/types.h> |
函数格式如下:
1 | pid_t getpid(void); |
函数返回值说明: 返回当前进程的 pid 值。
获取父进程的进程 ID 的系统调用函数是 getppid ,具体的说明如下:
1 | #include <sys/types.h> |
函数格式如下:
1 | pid_t getppid(void); |
函数返回值说明: 返回当前进程的父进程的 pid 值。
本关的编程任务是补全右侧代码片段中 Begin 至 End 中间的代码,具体要求如下:
1 |
|
当用户调用 fork 函数时,系统将会创建一个与当前进程相同的新进程。通常将原始进程称为父进程,而把新生成的进程称为子进程。子进程是父进程的一个拷贝,子进程获得同父进程相同的数据,但是同父进程使用不同的数据段和堆栈段。
在早期的系统中,创建进程比较简单。当调用 fork 时,内核会把所有的内部数据结构复制一份,复制进程的页表项,然后把父进程的地址空间中的内容也复制到子进程的地址空间中。但是从内核角度来说,这种复制方式是非常耗时的。
因此,在现代的系统中采取了更多的优化。现代的 Linux 系统采用了写时复制技术( Copy on Write ),而不是一创建子进程就将所有的数据都复制一份。
Copy on Write ( COW )的主要思路是:如果子进程/父进程只是读取数据,而不是对数据进行修改,那么复制所有的数据是不必要的。因此,子进程/父进程只要保存一个指向该数据的指针就可以了。当子进程/父进程要去修改数据时,那么再复制该部分数据即可。这样也不会影响到子父进程的执行。因此,在执行 fork 时,子进程首先只复制一个页表项,当子进程/父进程有写操作时,才会对所有的数据块进行复制操作。
fork 函数的具体的说明如下:
需要的头文件如下:
1 | #include <unistd.h> |
函数格式如下:
1 | pid_t fork(void); |
函数返回值说明: 调用成功, fork 函数两个值,分别是 0 和子进程 ID 号。当调用失败时,返回 -1 ,并设置错误编号 errno 。fork 函数调用将执行两次返回,它将从父进程和子进程中分别返回。从父进程返回时的返回值为子进程的 PID ,,而从子进程返回时的返回值为 0 ,并且返回都将执行 fork 之后的语句。
案例演示1: 编写一个程序,使用 fork 函数创建一个新进程,并在子进程中打印出其进程 ID 和父进程 ID ,在父进程中返回进程 ID 。详细代码如下所示:
1 |
|
将以上代码保存为 forkProcess.c 文件,编译执行。可以看到每次执行 forkProcess 时,子进程和父进程都不是固定的执行顺序,因此由 fork 函数创建的子进程执行顺序是由操作系统调度器来选择执行的。因此,子进程和父进行在执行的时候顺序不固定。
本关的编程任务是补全右侧代码片段中 Begin 至 End 中间的代码,具体要求如下:
1 |
|
vfork 函数是一个历史遗留产物。 vfork 创建进程与 fork 创建的进程主要有一下几点区别:
vfork 性能要比 fork 高,主要原因是 vfork 没有进行所有数据的复制,尽管 fork 采用了 COW 技术优化性能,但是也会为子进程的页表项进行复制,因此 vfork 要比 fork 快。
使用 vfork 时要注意,在子进程中对共享变量的修改也会影响到父进程,因此 vfork 在带来高性能的同时,也使得整个程序容易出错,因此,开发人员在使用 vfork 创建进程时,一定要注意对共享数据的修改。
由于 vfork 创建的子进程和父进程共享所有的数据(栈、堆等等),因此,采用 vfork 创建的子进程必须使用 exit 或者 exec 函数族(下一关将介绍这些函数的功能)来正常退出,不能使用 return 来退出。
exit 函数是用来结束正在运行的整个程序, exit 是系统调用级别,它表示一个进程的结束;而 return 是语言级别的,它表示调用堆栈的返回。
vfork 函数的具体的说明如下:
需要的头文件如下:
1 | #include <sys/types.h> |
函数格式如下:
1 | pid_t vfork(void); |
函数返回值说明: 调用成功, vfork 函数两个值,分别是 0 和子进程 ID 号。当调用失败时,返回 -1 ,并设置错误编号 errno 。
注意: vfork 函数调用将执行两次返回,它将从父进程和子进程中分别返回。从父进程返回时的返回值为子进程的 PID ,而从子进程返回时的返回值为 0 ,并且返回都将执行 vfork 之后的语句。 vfork 创建的子进程必须调用 exit 函数来退出子进程。
案例演示 1 : 编写一个程序,使用 vfork 函数创建一个新进程,并在子进程中打印出其进程 ID 和父进程 ID ,在父进程中返回进程 ID 。详细代码如下所示:
1 |
|
将以上代码保存为 vforkProcess.c 文件,编译执行。可以看到 vforkProcess 创建的子进程尽管使用 sleep 函数睡眠了 2 秒,但是函数父进程的执行顺序在子进程后,这就是 vfork 的特性。
当我们将以上代码中的 exit(0) 换成 return 0 时,则会出现如下错误。
出现以上错误的原因是当子进程使用 return 退出时,操作系统也会把栈清空,那么当父进程继续使用 return 退出时,则会发现栈已经被清空了,这就相当于 free 两次同一块内存,因此会出现错误。
本关的编程任务是补全右侧代码片段中 Begin 至 End 中间的代码,具体要求如下:
1 |
|
常见与退出进程相关的函数有: exit 、 _exit 、 atexit 、 on_exit 、 abort 和 assert 。
[ exit 和 _exit 区别]
exit 函数的具体的说明如下:
需要的头文件如下:
1 | #include <stdlib.h> |
函数族格式如下:
1 | void exit(int status); |
参数说明: status:设置程序退出码;
_exit 函数的具体的说明如下:
需要的头文件如下:
1 | #include <unistd.h> |
函数族格式如下:
1 | void _exit(int status); |
参数说明: status :设置程序退出码;
函数返回值说明: exit 和 _exit 均无返回值。
atexit 和 on_exit 函数的具体的说明如下:
需要的头文件如下:
1 | #include <stdlib.h> |
函数族格式如下:
1 | int atexit(void (*function)(void)); |
参数说明: atexit 函数的 function 参数是一个函数指针,指向无返回值和无参数的函数; on_exit 函数的 function 参数是一个函数指针,指向无返回值和有两个参数的函数,其中第一个参数是调用 exit() 或从 main 中返回时的值,参数 arg 指针会传给参数 function 函数;
函数返回值说明: atexit 和 on_exit 调用成功返回 0 ;调用失败返回一个非零值。
注意: atexit 和 on_exit 只有在程序使用 exit 或者 main 中正常退出时才会有效。如果程序使用 _exit 、 abort 或 assert 退出程序时,则不会执行被注册的函数。
abort 函数的具体的说明如下:
需要的头文件如下:
1 | #include <stdlib.h> |
函数族格式如下:
1 | void abort(void); |
assert 宏的具体的说明如下:
需要的头文件如下:
1 | #include <assert.h> |
函数族格式如下:
1 | void assert(scalar expression); |
参数说明: expression :需要被判断的表达式;
注意: assert 宏通常用于调试程序。
案例演示 1 : 使用 atexit 注册一个退出函数,使其在调用退出函数前被执行,详细代码如下所示:
1 |
|
将以上代码保存为 atexit.c 文件,编译执行。可以看到执行 atexit 程序后, out 函数被调用。
案例演示 2 : 使用 on_exit 注册一个退出函数,使其在调用退出函数前被执行,详细代码如下所示:
1 |
|
将以上代码保存为 on_exit.c 文件,编译执行。可以看到执行 on_exit 程序后, out 函数被调用,并且 status 变量的值就是 exit 函数退出的值。
案例演示1: 使用 abort 终止一个程序,详细代码如下所示:
1 |
|
将以上代码保存为 abort.c 文件,编译执行。可以看到执行 abort 程序后,程序被强行终止。
本关的编程任务是补全右侧代码片段中 Begin 至 End 中间的代码,具体要求如下:
1 |
|
**如果,当子进程在父进程前结束,则内核会把子进程设置为一个特殊的状态。这种状态的进程叫做僵死进程(zombie)**。尽管子进程退出的时候,内核释放该进程所有的资源,包括打开的文件,占用的内存。但是仍然保留了一些信息(如进程号pid退出状态 运行时间等)。只有父进程获取了子进程的这些信息后,子进程才会彻底的被销毁,否则一直保持僵死状态。如果系统中产生大量的僵尸进程,将导致系统没有可用的进程号,从而导致系统不能创建新的进程。
Linux处理僵死进程的方法之一是使用进程等待的系统调用wait和waitpid来使得父进程获取子进程的终止信息。
wait函数的具体的说明如下:
需要的头文件如下:
1 | #include <sys/types.h>#include <sys/wait.h> |
```
wait
1 |
|
pid_t wait(int *status);
1 |
|
#include <sys/types.h>#include <sys/wait.h>
1 |
|
函数格式如下:
1 | pid_t waitpid(pid_t pid, int *status, int options); |
参数说明:
1 | pid |
:用于指定所等待的进程。其取值和相应的含义如下所示:
| pid | 含义 |
|---|---|
| pid > 0 | 等待进程ID为pid所指定值的子进程 |
| pid = 0 | 等待进程组ID与该进程相同的子进程 |
| pid = -1 | 等待所有子进程,等价于wait调用 |
| pid < -1 | 等待进程组ID为pid绝对值的子进程 |
参数option则用于指定进程所做操作。其取值和相应的含义如下所示:
| option | 含义 |
|---|---|
| 0 | 将进程挂起等待其结束 |
| WNOHANG | 不使进程挂起而立刻返回 |
| WUNTRACED | 如果进程已结束则返回 |
参数status是一个整数指针,当子进程结束时,将子进程的结束状态字存放在该指针指向的缓存区。
| 宏定义 | 含义 |
|---|---|
| WIFEXITED(status) | 子进程正常结束时,返回值为真(非零值) |
| WEXITSTATUS(status) | 当WIFEXITED为真时,此宏才可以使用。返回进程退出的代码 |
| WIFSIGNALED(status) | 子进程接收到信号结束时,返回值为真。但如果进程接收到信号时调用exit函数结束,则返回值为假 |
| WTERMSIG(status) | 当WIFSIGNALED为真时,将获得终止该进程的信号 |
| WIFSTOPPED(status) | 在调用函数waitpid时制定了WUNTRACED选项,且该子进程使waitpid返回时,这个宏的返回值为真 |
| WSTOPSIG(status) | 当WIFSTOPPED为真时,将获得停止该进程的信号 |
pid;当设置选项WNOHANG,而调用中waitpid发现没有已退出的子进程可收集,则返回0;执行失败返回-1并设置错误代码errno。案例演示1: 编写一个程序,使用fork函数与wait函数结合创建一个新进程,使得新创建的子进程在父进程前执行。详细代码如下所示:
1 |
|
案例演示1: 编写一个程序,使用fork函数与waitpid函数结合创建一个新进程,使得新创建的子进程在父进程前执行。详细代码如下所示:
1 |
|
将以上代码保存为
waitpidProcess.c文件,编译执行。可以看到执行waitpidProcess程序后,尽管子进程使用sleep睡眠了2秒,还是子进程先执行,然后父进程才执行。waitpid函数可以实现与wait函数相同的功能。
本关的编程任务是补全右侧代码片段中Begin至End中间的代码,具体要求如下:
waitProcess函数,等待子进程结束,并且返回子进程的退出的代码。1 |
|
在上一个实训中提到,**vfork函数创建的子进程可以通过调用exec函数族来正确退出。其原理是,使用exec函数族可以执行一个新的程序,并且以新的子进程来完全替换原有的进程地址空间**。
exec函数族的作用是根据指定的文件名找到可执行文件,并用它来取代调用进程的内容,换句话说,就是在调用进程内部执行一个可执行文件。这里的可执行文件既可以是二进制文件,也可以是任何Linux下可执行的脚本文件。
通常exec函数族用来与vfork函数结合一起使用。使用vfork函数创建一个子进程,然后在子进程中使用exec函数族来执行一个新的程序。当在由vfork创建的子进程中使用exec函数族来执行新程序时,子进程的地址空间会被新执行的程序完全覆盖,并且此时vfork的父进程与子进程地址空间被分离开,也就是使用exec函数族创建的新程序不会对vfork的父进程造成任何影响。
exec函数族是库函数,因此使用man 3 exec来查看其使用方法。
exec函数族的具体的说明如下:
需要的头文件如下:
1 |
函数族格式如下:
1 | int execl(const char *path, const char *arg, ... /* (char *) NULL */); |
参数说明:
函数名中含有字母l的函数,其参数个数不定。其参数由所调用程序的命令行参数列表组成,最后一个NULL表示结束。函数名中含所有字母v的函数,则是使用一个字符串数组指针argv指向参数列表,这一字符串数组和含有l的函数中的参数列表完全相同,也同样以NULL结束。
函数名中含有字母p的函数可以自动在环境变量PATH指定的路径中搜索要执行的程序。因此它的第一个参数为file表示可执行函数的文件名。而其他函数则需要用户在参数列表中指定该程序路径,其第一个参数path 是路径名。路径的指定可以是绝对路径,也可一个是相对路径。但出于对系统安全的考虑,建议使用绝对路径而尽量避免使用相对路径。
函数名中含有字母e的函数,比其他函数多含有一个参数envp。该参数是字符串数组指针,用于制定环境变量。调用这两个函数时,可以由用户自行设定子进程的环境变量,存放在参数envp所指向的字符串数组中。这个字符串数组也必须由NULL结束。其他函数则是接收当前环境。
函数返回值说明: 只有当函数执行失败时,exec函数族才会返回-1并设置错误代码errno。当执行成功时,exec函数族是不会返回任何值。
案例演示1: 编写一个程序,使用vfork函数与exec函数族结合创建一个新进程,并在子进程中执行touch testFile命令创建一个testFile文件,在父进程中返回进程ID。详细代码如下所示:
1 |
|
将以上代码保存为
execlProcess.c文件,编译执行。可以看到执行execlProcess程序后,在当前目录下创建了一个名为testFile的文件。
本关的编程任务是补全右侧代码片段中Begin至End中间的代码,具体要求如下:
execlProcess函数,使用vfork函数创建进程,并在子进程中调用创建一个名为testDir的目录,在父进程中输出”Parent Process”字符串。1 |
|
system函数是一个和操作系统相关紧密的函数。用户可以使用它来在用户自己的程序中调用系统提供的各种命令。
执行系统的命令行,其实也是调用程序创建一个进程来实现的。实际上,system函数的实现正是通过调用fork、exec和waitpid函数来完成的。详细的实现思路是:首先使用fork创建一个新的进程,并且在子进程中通过调用exec函数族来执行一个新程序,在父进程中通过waitpid函数等待子进程的结束,同时也获取子进程退出代码。
system函数是库函数,因此使用man 3 system来查看其使用方法。
system函数的具体的说明如下:
需要的头文件如下:
1 | #include <stdlib.h> |
函数格式如下:
1 | int system(const char *command); |
参数说明: command:需要被执行的命令;
函数返回值说明: 执行成功,返回值是执行命令得到的返回状态,如同wait的返回值一样。执行失败时返回的值分为以下几种情况:执行system函数时,它将调用fork、exec和waitpid函数。其中任意一个调用失败都可以使得system函数的调用失败。如果调用fork函数出错,则返回值为-1,errno被设置为相应错误;如果调用exec时失败,则表示shell无法执行所设命令,返回值为shell操作的返回值;如果调用waitpid函数失败,则返回值也为-1,errno被置为相应值。
案例演示1: 编写一个程序,使用system函数来执行touch testFile命令创建一个testFile文件。详细代码如下所示:
1 |
|
将以上代码保存为
system.c文件,编译执行。可以看到执行system程序后,在当前目录下创建了一个名为testFile的文件。
本关的编程任务是补全右侧代码片段中Begin至End中间的代码,具体要求如下:
createProcess函数,使用system函数创建一个名为testDir的目录(** 调用成功返回命令的状态码,失败返回-1**)。1 |
|
在Linux系统中Shell是非常重要的一个工具,Shell是一个用C语言编写的程序,它是用户使用 Linux 的桥梁。当打开一个Shell(终端),我们直接可以在命令行中输入要执行的命令,然后Shell会自动的读取我们输入的命令,最后执行这些命令。
RShell的主要思路是:(1)读取用户输入的命令;(2)然后创建一个子进程;(3)使用exec函数族来执行输入的命令,同时挂起父进程;当子进程执行完成后,重复执行步骤1-3即可实现一个简单的命令解析器工具。
system函数实现一个简单的命令解析器system函数可以执行一个命令,那么本案例将介绍如何使用system函数来实现一个简单的命令解析器RShell。详细的步骤可分为以下几步:
1 | 读取用户输入; |
详细的代码设计为:
1 |
|
将以上代码保存为
systemRShell.c文件中,编译执行。可以看到执行systemRShell命名后,我们就可以输入要执行的命令,然后按下回车,该命令就会被执行。当想退出systemRShell时,只需要输入exit回车即可。
fork、exec函数族和wait实现一个简单的命令解析器fork和exec也可以完成执行一个新程序。详细的步骤可分为以下几步:
1 | 读取用户输入; |
详细的代码设计为:
1 |
|
将以上代码保存为
execRShell.c文件中,编译执行。可以看到使用fork、exec和wait也可以实现一个简单的命令解析器工具。
本关的编程任务是补全右侧代码片段中Begin至End中间的代码,具体要求如下:
RShell函数,实现一个简单的命令解析器工具。(提示:可以使用system函数或者fork+exec+wait。)1 |
|
在 Linux 中,每一个信号都有一个名字,这些名字以 SIG 开头。例如, SIGABRT 是夭折信号,当进程调用 abort 函数时会产生这种信号。SIGALRM 是闹钟信号,由 alarm 函数设置的定时器超时后将产生此信号。
信号产生是指触发信号的事件的发生。
例如,通过键盘输入组合键CTRL+C系统会收到 SIGINT。 通过killall -sigid processname以给指定进程发送信号。
比如killall -SIGKILL testsignal给 testsignal 发送 SIGKILL 信号,即杀死进程的信号。
SIGUSR1 和 SIGUSR2 是用户自定义信号,通过上述的方式也可以将信号 SIGUSR1 和 SIGUSR2 传递给进程。
信号是异步事件的经典实例,产生信号的事件对进程而言是随机出现的。进程不能简单地测试一个变量来判断是否发生了一个信号,而是必须告诉内核“在此信号发生时,请执行以下操作”。
在某个信号出现时,可以告诉内核按照以下三种方式之一进行处理,我们称之为信号的处理或与信号相关的动作:
信号的处理是由内核来代理的,首先程序通过 signal 为每个信号注册处理函数,而内核中有一张信号向量表,对应信号处理机制。这样,信号在进程中注销完毕之后,会调用相应的处理函数进行处理。
在系统调用或中断返回用户态的前夕,内核会检查未决信号集,进行相应的信号处理。
signal 函数是最简单的信号处理接口,也是使用比较广泛的一个接口。
1 |
|
参数的含义:
signum:信号名,一般不允许是 SIGKILL 或 SIGSTOP ;handler:常量 SIG_IGN、常量 SIG_DFL或者当收到此信号后要调用的函数的地址。如果是 SIG_IGN,则忽略此信号。如果是 SIG_DFL,则使用系统默认动作。返回值:返回 sighandler_t句柄或者 SIG_ERR。
应用示例:
1 |
|
运行步骤如下: 运行程序: 在 10s 内按键CTRL+C。
运行结果如下: hello! ^Ccatch signal! hello!
在主函数的最开始会初始化一个全部变量 g_i4event 为 0。
本关的编程任务是补全右侧代码片段中两段Begin至End中间的代码,具体要求如下:
1 |
|
在 Linux 信号处理函数中,signal函数是最基本的,由于系统版本的不同,signal 由ISO C定义。因为 ISO C 不涉及到多进程、进程组以及终端 I /O等,所以它对信号的定义比较模糊。
从Unix system V派生的实现支持 signal 函数,但该函数提供旧的不可靠信号语义。4.4BSD 也提供了 signal 函数,并且提供了新的信号语义。
因此,signal 的语义与实现有关,为了保险起见,最好使用别的函数来代替 signal 函数。这个函数是 sigaction,也是本实训讲解的重点。
sigaction 函数取代了 UNIX 早期版本使用的 signal 函数。
1 |
|
参数的含义:
注:如果把第二、第三个参数都设为NULL,那么该函数可用于检查信号的有效性。
返回值: 0 表示成功,-1 表示有错误发生。
功能: sigaction 函数用于改变进程接收到特定信号后的行为。
sigaction 函数最重要的部分就是sigaction结构体,这个被应用于参数 act 和 oldact 中,其定义如下:
1 | struct sigaction |
_sa_handler以及 _sa_sigaction 指定信号关联函数,即用户指定的信号处理函数。除了可以是用户自定义的处理函数外,还可以为SIG_DFL(采用缺省的处理方式),也可以为 SIG_IGN (忽略信号);1 | siginfo_t |
注:请注意 sa_mask 指定的信号阻塞的前提条件:在sigaction()安装信号的处理函数执行过程中,由 sa_mask 指定的信号才会被阻塞。在使用 sigaction 之前,请务必清空或者设置自己所需要的屏蔽字段。
应用示例:
1 |
|
运行步骤如下:
CTRL +C。运行结果如下: hello! ^Ccatch signal! hello!
在主函数的最开始会初始化一个全部变量 g_i4event 为 0。
本关的编程任务是补全右侧代码片段中两段Begin至End中间的代码,具体要求如下:
注:采用_sa_sigaction和SA_SIGINFO来实现。
1 |
|
使用 alarm 函数可以设置一个定时器,在将来的某个时刻,这个定时器就会超时。当超时时,会产生 SIGALRM 信号。如果忽略或者不捕捉此信号,则其默认动作时终止调用该 alarm 函数的进程。
1 |
|
参数: seconds ,是产生信号需要经过的时钟秒数,也就是定时器的时间。
alarm 安排内核调用进程——在指定的 seconds 秒后发出一个 SIGALRM 的信号。如果指定的参数 seconds 为 0 ,则不再发送 SIGALRM 信号。后一次设定将取消前一次的设定。该调用返回值为上次定时调用到发送之间剩余的时间,或者因为没有前一次定时调用而返回 0 。
注意,在使用时,alarm 只设定为发送一次信号,如果要多次发送,需要多次使用 alarm 调用。
应用示例:
1 |
|
运行结果如下:
1 | wait for alarm signal! |
在主函数的最开始会初始化一个全部变量 g_i4event 为 0 。
本关的编程任务是补全右侧代码片段中两段Begin至End中间的代码,具体要求如下:
1 |
|
本关将介绍命名管道的使用方法。对于命名管道和普通文件的操作一样,使用open函数打开,然后使用read和close进行读写操作,最后使用close函数对其进行关闭。与普通文件操作的不同点是:使用read读取普通文件,read不会阻塞。而read读取管道文件,read会阻塞运行,直到管道中有数据或者所有的写端关闭。
命名管道相对比无名管道的好处是可以在两个不同的程序进行数据的传输。并且命名管道当写端彻底关闭后,读端read才会返回0。 注意:
如果管道的读端提前关闭,写端继续写入数据就会发生异常。 读端读取管道中的数据,只要读过的数据就会被清空 。 命名管道使用方法 创建命名管道的库函数是mkfifo,具体的说明如下:
需要的头文件如下: #include <sys/types.h> #include <sys/stat.h> 函数格式如下: int mkfifo(const char *pathname, mode_t mode); 参数说明: pathname:存放命名管道的文件名; mode:创建命名管道的权限,与创建文件的权限参数一致; mode设置说明:
S_IRUSR: 文件所有者的读权限位 S_IWUSR: 文件所有者的写权限位 S_IXUSR : 文件所有者的执行权限位 S_IRGRP: 所有者同组用户的读权限位 S_IWGRP: 所有者同组用户的写权限位 S_IXGRP: 所有者同组用户的执行权限位 S_IROTH: 其他用户的读权限位 S_IWOTH: 其他用户的写权限位 S_IXOTH: 其他用户的执行权限位 函数返回值说明: 调用成功时,返回值0;调用失败时,返回值为-1并设置错误编号errno。 案例演示1: 使用mkfifo函数在当前目录下创建一个命名管道testFIFO,并设置权限为644,并用来传送数据。详细代码如下所示:
1 |
|
将以上代码保存为createFIFO.c文件,编译执行。
1 |
|
将以上代码保存为writeFIFO.c文件,编译执行。
1 |
|
将以上代码保存为readFIFO.c文件,编译执行。 首先执行createFIFO程序来创建一个命名管道,然后执行writeFIFO程序用来向管道中写入数据,最后在另一个终端中执行readFIFO程序从管道中读取数据。
本关的编程任务是补全右侧代码片段中Begin至End中间的代码,具体要求如下:
创建一个名为FIFO的命名管道文件,并设置权限为650。
1 |
|
在Linux系统中,每种协议都有自己的网络地址数据结构,这些数据结构都以sockaddr_开头,不同的是后缀表示不同的协议。最为常见的是IPv4协议,它的网络地址数据结构为sockaddr_in。
由于历史的缘故,在有些库函数中,特定协议的套接字地址结构都要强制转为通用的套接字地址结构,该数据结构被定义在<sys.socket.h>头文件中,详细定义如下所示:
1 | struct sockaddr |
其中,sa_family表示套接字的协议族类型,对应于TCP/IP协议该值为AF_INET;成员sa_data存储具体的协议地址。一般在编程中并不对该结构体进行操作,而是使用另一个与它等价的数据结构,例如,IPv4协议的网络地址数据结构为sockaddr_in,格式如下所示:
1 | struct sockaddr_in { |
其中,sa_family表示套接字的协议族类型,对应于TCP/IP协议该值为AF_INET;sin_port表示端口号;sin_addr用来存储32位的IP地址,数组sin_zero为填充字段,一般赋值为0。
struct in_addr的定义如下所示:
1 | struct in_addr { |
结构体sockaddr的长度为16字节,结构体sockaddr_in的长度也为16字节,通常在编写基于TCP/IP协议的网络程序时,使用结构体sockaddr_in来设置地址,然后通过强制类型转换成sockaddr类型。结构sockaddr_in与sockaddr的转换关系如下图所示:
TCP网络编程是目前比较通用的方式,例如:HTTP协议、FTP协议等很多广泛应用的协议都是基于TCP协议实现的。TCP编程有两种模式,分别是服务器模式和客户端模式。无论是服务器模式还是客户端模式首先需要创建一个TCP套接字,对于服务器模式,我们还需要绑定一个本地端口。
Linux系统中提供了socket与bind两个系统调用函数用来创建套接字与绑定端口操作。
以上函数我们可以使用man命令来查询该函数的使用方法。具体的查询命令为:man 2 函数名。
Linux系统提供一个socket系统调用来创建一个套接字。 socket函数的具体的说明如下:
需要的头文件如下:
1 | #include <sys/types.h>#include <sys/socket.h> |
函数格式如下:
1 | int socket(int domain, int type, int protocol); |
参数说明:
1 | domain:创建套接字所使用的协议族;type:套接字类型;protocol:用于指定某个协议的特定类型,通常某个协议中只有一种特定类型,这样该参数的值仅能设置为0; |
domain参数的常用的协议族如下表所示:
| 取值 | 含义 |
|---|---|
| AF_UNIX | 创建只在本机内进行通信的套接字 |
| AF_INET | 使用IPv4 TCP/IP协议 |
| AF_INET6 | 使用IPv6 TCP/IP协议 |
type参数的常用的套接字类型如下表所示:
| 取值 | 含义 |
|---|---|
| SOCK_STREAM | 创建TCP流套接字 |
| SOCK_DGRAM | 创建UDP流套接字 |
| SOCK_RAW | 创建原始套接字 |
-1,并设置错误代码errno。案例演示1: 创建一个使用IPv4协议族的TCP类型的套接字。详细代码如下所示:
1 |
|
将以上代码保存为
createTCP.c文件,编译执行。
在TCP服务器模式编程中,我们需要讲一个端口绑定到一个已经建立的套接字上,这样方便客户端程序根据绑定的端口来连接服务器程序。Linux提供了一个bind函数来将一个套接字和某个端口绑定在一起。 socket函数的具体的说明如下:
需要的头文件如下:
1 | #include <sys/types.h>#include <sys/socket.h> |
函数格式如下: int bind(int sockfd, const struct sockaddr *addr, socklen_t addrlen); 参数说明:
1 | sockfd:已经创建的套接字;addr:是一个指向sockaddr参数的指针,其中包含了IP地址、端口;addrlen:addr结构的长度; |
函数返回值说明: 调用成功,返回值为0,否则返回-1,并设置错误代码errno。
注意:
1 | 如果创建套接字时使用的是AF_INET协议族,则addr参数所使用的结构体为struct sockaddr_in指针(详细定义见相关知识)。当设置addr参数的sin_addr为INADDR_ANY而不是某个确定的IP地址时,就可以绑定到任何网络接口。对于只有一个IP地址的计算机,INADDR_ANY对应的就是它的IP地址;对于有多个网卡的主机,INADDR_ANY表示本服务器程序将处理来自任何网卡上相应端口的连接请求。由于计算机中的字符与网络中的字符存储顺序不同。计算机中的整型数与网络中的整型数进行交换时,需要借用相关的函数进行转换。这些函数如下所示: |
使用man 2 函数名可以查看其详细的介绍。
案例演示1: 创建一个使用IPv4协议族的TCP类型的套接字,并与6666这个端口进行绑定。详细代码如下所示:
1 |
|
将以上代码保存为
bindPort.c文件,编译执行。
本关的编程任务是补全右侧代码片段中Begin至End中间的代码,具体要求如下:
bindSocket函数中代码,绑定一个指定的本地端口。1 |
|
所谓TCP套接字的监听,指的是TCP套接字的端口处于等待状态,如果有客户端发出连接请求时,这个端口将会接受这个连接请求。连接指的是客户端向服务器发出一个通信请求,服务器会响应这个请求。
当服务器处于监听状态时,如果获得了一个客户端请求,则服务器将会将这个请求存放等待队列中。当系统处于空闲状态时,服务器将会从等待队列中取出请求,接受这个请求并处理这个请求。
Linux系统中提供了listen与accept两个系统调用函数用来监听和接受连接请求操作。
以上函数我们可以使用man命令来查询该函数的使用方法。具体的查询命令为:man 2 函数名。
Linux系统提供一个listen系统调用来实现监听等待功能。 listen函数的具体的说明如下:
需要的头文件如下:
1 | #include <sys/types.h>#include <sys/socket.h> |
函数格式如下: int listen(int sockfd, int backlog); 参数说明:
1 | sockfd:已经创建的套接字;backlog:能同时监听的最大连接请求; |
函数返回值说明: 调用成功,返回值为0,否则返回-1,并设置错误代码errno。
注意:listen并未真正接受客户端的连接请求,只是设置socket的状态为listen模式。
案例演示1: 使用listen函数来监听指定端口的连接信息。详细代码如下所示:
1 |
|
将以上代码保存为
listenPort.c文件,编译执行。
当服务器处理监听状态时,如果客户端发出一个连接请求,则服务器需要接受这个请求,并处理该请求。Linux提供了一个accept函数来接受客户端的连接请求。 accept函数的具体的说明如下:
需要的头文件如下:
1 | #include <sys/types.h>#include <sys/socket.h> |
函数格式如下: int accept(int sockfd, struct sockaddr *addr, socklen_t *addrlen); 参数说明:
1 | sockfd:已经创建的套接字;addr:保存发起连接请求的主机IP地址和端口信息;addrlen:addr结构的长度; |
函数返回值说明: 调用成功返回值为被接受请求的套接字编号,否则返回-1,并设置错误代码errno。
注意:当accept函数接受了一个连接时,会返回一个新的socket编号。接下来的数据传送与读取都是通过这个新的socket编号进行处理的。
案例演示1: 使用accept函数来接受客户端的请求,并打印出客户端主机的基本信息。详细代码如下所示:
1 |
|
将以上代码保存为
acceptClient.c文件,编译执行。在浏览器中,输入localhost:6666进行请求,由于HTTP请求也是采用TCP协议进行传送,所以在对6666端口进行访问时,服务器接受了该请求,并打印出了发起连接请求客户端IP地址和端口。
本关的编程任务是补全右侧代码片段中Begin至End中间的代码,具体要求如下:
main函数中代码,监听8888号端口(设置监听的个数大于1),并接受来自客户端的第一个连接请求。1 |
|
所谓请求连接,指的就是在客户机上向服务器发送信息时,首先需要发送一个连接请求。当服务器接受了客户端的连接请求后,客户端就可以与服务器进行数据的交换。
所谓终止连接,指的就是客户端与服务器之间交换完数据后,需要断开当前连接并释放相关的资源,这样方便下一个客户端的请求。由于服务器同时处理的连接请求数是有限的,所以当客户端交换完数据后不终止连接就会导致后续请求的连接失败。
建立TCP连接时需要经历3次握手操作,主要步骤如下:
1 | 连接开始时,客户端发送SYN包,并包含了自己的初始序号a;服务器收到SYN包以后会回复一个SYN包,其中包含了对上一个a包的回应信息ACK和自己的初始序号b;客户端收到回应的SYN包以后,回复一个ACK包做响应; |
[
TCP建立连接三次握手过程]
终止TCP连接时需要经历4次握手操作,主要步骤如下:
1 | 首先进行关闭的一方(即发送第一个FIN)将执行主动关闭,而另一方(收到这个FIN)执行被动关闭;当被动关闭方收到这个FIN,它发回一个ACK;被动关闭方发送一个FIN请求;主动关闭方收到这个FIN请求后,回复一个ACK请求; |
[
TCP终止连接四次握手过程]
Linux系统中提供了connect与close两个系统调用函数用来建立和终止连接请求操作。
以上函数我们可以使用man命令来查询该函数的使用方法。具体的查询命令为:man 2 函数名。
Linux系统提供一个connect系统调用来实现连接目标网络服务功能。 connect函数的具体的说明如下:
需要的头文件如下:
1 | #include <sys/types.h>#include <sys/socket.h> |
函数格式如下: int connect(int sockfd, const struct sockaddr *addr, socklen_t addrlen); 参数说明:
1 | sockfd:已经创建的套接字;addr:指针要连接的服务器IP地址和端口信息;addrlen:addr结构的长度; |
函数返回值说明: 调用成功,返回值为0,否则返回-1,并设置错误代码errno。
案例演示1: 在上一关卡的案例中,我们实现了如何监听和接受连接,本案例将使用connect实现与上一关卡案例中的服务器建立连接关系。详细代码如下所示:
1 |
|
将以上代码保存为
connectServer.c文件,编译执行。可以看到建立连接成功,服务器将客户端的IP地址和端口打印出来。注意:客户端的端口是随机分配的。
当客户端与服务器进行数据交换完成后,我们需要断开已经建立的连接。Linux提供了两个函数来终止连接,分别是close函数和shutdown函数。
close函数的使用方法与文件的关闭一样,只需将要关闭的套接字传给函数即可,此处就不做详细的介绍。
shutdown函数的具体的说明如下:
需要的头文件如下:
1 | #include <sys/socket.h> |
函数格式如下:
1 | int shutdown(int sockfd, int how); |
参数说明:
1 | sockfd:已经建立连接的套接字编号;how:具体的关闭行为; |
how参数的常用取值及其含义如下表所示:
| 取值 | 含义 |
|---|---|
| SHUT_RD | 表示切断读,之后不能使用该套接字进行读操作 |
| SHUT_WR | 表示切断写,之后不能使用该套接字进行写操作 |
| SHUT_RDWR | 表示切断读写,与close函数功能一样 |
0,否则返回-1,并设置错误代码errno。本关的编程任务是补全右侧代码片段中Begin至End中间的代码,具体要求如下:
connectSocket函数中代码,向指定的服务器发出连接请求。1 |
|
当创建好TCP套接字并且完成了客户端与服务器间的连接,接下来,我们就可以实现在客户端与服务器间的数据传送功能。
在客户端与服务器间进行数据传送时,一端(客户端/服务器)用于向建立好的套接字写入数据,另一端(服务器/客户端)用于从建立好的套接字中读取数据,这样一来一回的就实现了客户端与服务器间的数据交换功能。
[
TCP服务器与客户端间的数据传送框架]
Linux系统中提供了recv、send、read和write四个系统调用函数用来完成客户端与服务器间的数据发送和接收操作。
以上函数我们可以使用man命令来查询该函数的使用方法。具体的查询命令为:man 2 函数名。
Linux系统提供recv和send系统调用来实现数据的发送与接收功能。 recv和send函数的具体的说明如下:
需要的头文件如下:
1 | #include <sys/types.h>#include <sys/socket.h> |
函数格式如下:
1 | ssize_t recv(int sockfd, void *buf, size_t len, int flags);ssize_t send(int sockfd, const void *buf, size_t len, int flags); |
参数说明:
1 | sockfd:已经创建的套接字;buf:用于存放接收和发送的数据;len:buf的长度;flags:设置接收与发送的控制选项,一般设置为0; |
函数返回值说明: 调用成功,返回值为实际接收或发送的数据字节个数,否则返回-1,并设置错误代码errno。
案例演示1: 使用recv和send函数实现客户端与服务器间的数据传送功能,客户端读取用户的数据并发送给服务器,服务器接收到数据后打印出来,当客户端读取到exit字符串时,关闭当前连接。详细代码如下所示:
客户端主要代码:
1 |
|
将以上代码保存为sendData.c文件。
服务器主要代码:
1 |
|
将以上代码保存为recvData.c文件。
编译执行以上两个程序,可以看到服务器接收到了客户端发过来的数据,并将其打印出来。注意:先执行
recvData,再执行sendData程序。
Linux系统可以使用write和read系统调用来实现数据的发送与接收功能。 write和read函数的具体的说明如下:
需要的头文件如下:
1 | #include <unistd.h> |
函数格式如下:
1 | ssize_t write(int fd, const void *buf, size_t count);ssize_t read(int fd, void *buf, size_t count); |
参数说明:
1 | fd:已经创建的套接字;buf:用于存放接收和发送的数据;count:buf的长度; |
函数返回值说明: 调用成功,返回值为实际接收或发送的数据字节个数,否则返回-1,并设置错误代码errno。
注意:write和read函数的使用方法与文件的读写相同,此处就不做详细的案例介绍。
本关的编程任务是补全右侧代码片段中Begin至End中间的代码,具体要求如下:
main函数中代码,实现服务器与客户端间的数据传送功能。1 |
|
所谓无连接的套接字通信,指的就是使用UDP协议进行数据的传输。使用这种协议进行通信时,两台计算机间是不需要建立连接的。
在实训Linux之网络编程(TCP)中,我们介绍了使用TCP协议进行数据的传输。TCP协议是需要在服务器与客户端间进行建立连接的,并且能够保证传输的数据可靠的到达对方。那么TCP协议与UDP协议的区别主要包括以下几点:
1 | TCP是面向连接的,也就是在数据传输前需要建立连接;而UDP时无连接的,即数据传输前不需要建立连接;TCP提供可靠的服务,也就是使用TCP协议传输的数据不会丢失、不会重复并且按序到达;而UDP协议尽最大努力将数据传输到对方,即不保证可靠交付;由于TCP需要对数据进行校验保证可靠交付,所以其实时性不如UDP好;TCP对系统资源需求较大;而UDP相对需求较少; |
由于UDP以简单、传输快的优势,在很多应用场景下取代了TCP。例如:在视频会议、语音通话场景下,UDP协议就比TCP协议更适合。因为,视频和语音丢部分内容不会影响到结果,而这些对实时性要求很高,所以采用UDP协议更适合。
在编程方面,UDP使用到的数据结构与TCP一致。例如在IPv4协议下,都使用struct sockaddr_in结构体来表示网络地址信息。
Linux系统中提供了socket与bind两个系统调用函数用来创建套接字与绑定端口操作。
以上函数我们可以使用man命令来查询该函数的使用方法。具体的查询命令为:man 2 函数名。
Linux系统提供一个socket系统调用来创建一个套接字。 socket函数的具体的说明如下:
需要的头文件如下:
1 | #include <sys/types.h>#include <sys/socket.h> |
函数格式如下:
1 | int socket(int domain, int type, int protocol); |
参数说明:
1 | domain:创建套接字所使用的协议族;type:套接字类型;protocol:用于指定某个协议的特定类型,通常某个协议中只有一种特定类型,这样该参数的值仅能设置为0; |
domain参数的常用的协议族如下表所示:
| 取值 | 含义 |
|---|---|
| AF_UNIX | 创建只在本机内进行通信的套接字 |
| AF_INET | 使用IPv4 TCP/IP协议 |
| AF_INET6 | 使用IPv6 TCP/IP协议 |
type参数的常用的套接字类型如下表所示:
| 取值 | 含义 |
|---|---|
| SOCK_STREAM | 创建TCP流套接字 |
| SOCK_DGRAM | 创建UDP流套接字 |
| SOCK_RAW | 创建原始套接字 |
-1,并设置错误代码errno。案例演示1: 创建一个使用IPv4协议族的UDP类型的套接字。详细代码如下所示:
1 |
|
将以上代码保存为
createUDP.c文件,编译执行。
在UDP服务器模式编程中,我们需要将一个端口绑定到一个已经创建好的套接字上,这样方便客户端程序根据绑定的端口来向服务器传输数据。Linux提供了一个bind函数来将一个套接字和某个端口绑定在一起。 socket函数的具体的说明如下:
需要的头文件如下:
1 | #include <sys/types.h>#include <sys/socket.h> |
函数格式如下: int bind(int sockfd, const struct sockaddr *addr, socklen_t addrlen); 参数说明:
1 | sockfd:已经创建的套接字;addr:是一个指向sockaddr参数的指针,其中包含了IP地址、端口;addrlen:addr结构的长度; |
函数返回值说明: 调用成功,返回值为0,否则返回-1,并设置错误代码errno。
提示:使用bind函数为UDP协议绑定一个端口的使用方法与为TCP协议绑定端口一致,详细介绍请参看实训 Linux之网络编程(TCP) 中的第一关卡内容。
本关的编程任务是补全右侧代码片段中Begin至End中间的代码,具体要求如下:
UDPSocket函数中代码,创建一个UDP套接字,并绑定一个指定的本地端口。1 |
|
由于UDP协议不需要建立连接即可进行数据的传输,在服务器端创建好UDP套接字并绑定一个本地端口后,接下来,我们就可以实现在客户端与服务器间的数据传送功能。
在客户端与服务器间进行数据传送时,一端(客户端/服务器)用于向建立好的套接字写入数据,另一端(服务器/客户端)用于从建立好的套接字中读取数据,这样一来一回的就实现了客户端与服务器间的数据交换功能。
在实训Linux之网络编程(TCP)中介绍的TCP数据传输使用到的函数是recv、send、read和write四个系统调用。而UDP协议数据传输使用的函数是sendto和recvfrom两个系统调用函数。
Linux系统中提供了sendto和recvfrom两个系统调用函数用来完成UDP协议的客户端与服务器间的数据发送和接收操作。
以上函数我们可以使用man命令来查询该函数的使用方法。具体的查询命令为:man 2 函数名。
UDP协议的数据发送Linux系统提供sendto系统调用来实现数据的发送功能。 sendto函数的具体的说明如下:
需要的头文件如下:
1 | #include <sys/types.h>#include <sys/socket.h> |
函数格式如下:
1 | ssize_t sendto(int sockfd, const void *buf, size_t len, int flags, const struct sockaddr *dest_addr, socklen_t addrlen); |
参数说明:
1 | sockfd:已经创建的套接字;buf:用于存放接收和发送的数据;len:buf的长度;flags:设置接收与发送的控制选项,一般设置为0;dest_addr:要发往主机的网络地址信息;addrlen:dest_addr的长度; |
函数返回值说明: 调用成功,返回值为实际发送的数据字节个数,否则返回-1,并设置错误代码errno。
UDP协议的数据接收Linux系统可以使用recvfrom系统调用来实现数据的接收功能。 recvfrom函数的具体的说明如下:
需要的头文件如下:
1 | #include <sys/types.h>#include <sys/socket.h> |
函数格式如下:
1 | ssize_t recvfrom(int sockfd, void *buf, size_t len, int flags, struct sockaddr *src_addr, socklen_t *addrlen); |
参数说明:
1 | sockfd:已经创建的套接字;buf:用于存放接收和发送的数据;len:buf的长度;flags:设置接收与发送的控制选项,一般设置为0;src_addr:要接收主机的网络地址信息;addrlen:src_addr的长度; |
函数返回值说明: 调用成功,返回值为实际接收的数据字节个数,否则返回-1,并设置错误代码errno。
案例演示1: 利用UDP协议实现如下功能:使用recvfrom和sendto函数实现客户端与服务器间的数据传送功能,客户端读取用户的数据并发送给服务器,服务器接收到数据后打印出来,当客户端读取到exit字符串时,关闭当前客户端套接字,当服务器收到exit字符串时,关闭当前服务器套接字。详细代码如下所示:
客户端主要代码:
1 |
|
将以上代码保存为sendData.c文件。
服务器主要代码:
1 |
|
将以上代码保存为recvData.c文件。
编译执行以上两个程序,可以看到服务器接收到了客户端发过来的数据,并将其打印出来。 注意:
1 | 先执行recvData,再执行sendData程序;由于UDP协议可以实现多个客户端对于一个服务器,所以当客户端退出后,服务器是不会退出的,因此,我们通过接收客户端传来的数据来判断是否服务器也需要退出; |
本关的编程任务是补全右侧代码片段中Begin至End中间的代码,具体要求如下:
main函数中代码,使用UDP协议实现服务器与客户端间的数据传送功能。exit字符串时,退出当前服务器程序(提示:不打印退出字符串exit)。1 |
|
通过前2关的学习,我们学会如何使用UDP协议来在不同的计算机间传输数据。使用UDP协议通信时,客户端与服务器的交互过程如下图所示:
[
UDP协议的套接字通信]
利用以上2关的知识就可以简单的文件上传工具。该工具包含两部分内容,分别是接收文件的服务器和上传文件的客户端。
实现文件上传服务器主要分为以下几个步骤:
1 | 首先是接收要上传的文件名称;当接收到客户端发来的文件名称后,在本地创建该文件;从客户端中接收文件的内容,并保存在创建好的文件中;当客户端上传文件内容接收后,服务器关闭创建的文件; |
通过以上几步就可以实现文件上传服务器的功能。为了识别客户端发送来的数据类型,我们定义了以下协议:
1 | 我们定义客户端与服务器间的数据块为1024KB(也就是每次传输的数据大小);我们将每个数据块的前1个字节定义为数据块的类型,也就是用于标示该数据块中的内容是文件名称或文件内容或上传结束,我们使用f表示该数据块为文件名称,c标示该数据块为文件内容,e表示上传结束; |
详细的代码设计为:
1 |
|
将以上代码保存为uploadFileServer.c文件中,编译执行。
实现文件上传客户端主要分为以下几个步骤:
1 | 首先是获取要上传文件的名称,并将该名称发送给服务器;当收到服务器的回复后,打开文件并读取内容,将读取的内容发送给服务器;当文件所有内容发送完成后,给服务器发送一个上传完成的标识,并退出客户端; |
通过以上几步就可以实现文件上传客户端的功能。我们遵循在实现服务器时定义的协议,同时为了有序的将文件内容发送到服务器,因此,我们需要服务器每次接收成功一块数据后,给客户端返回一个标识,当客户端收到该标识后再继续发送下一块的内容。
详细的代码设计为:
1 |
|
将以上代码保存为uploadFileClient.c文件中,编译执行。
编译执行,我们可以看到客户端将要上传的文件成功上传到了服务器。 注意:
1 | 因为同一目录下不能存在两个名称相同的文件,因此不要将服务器程序放置到与上传文件所在的目录下;首先要先执行服务器程序uploadFileServer,然后再执行客户端程序uploadFileClient; |
本关的编程任务是补全右侧代码片段中Begin至End中间的代码,具体要求如下:
补全downloadFileClient函数,该函数是用来从服务器上下载一个指定的文件,实现下载文件的客户端部分。
下载文件要遵循以下步骤:
1 | 首先向服务器发送当前要下载的文件名称;从服务器接收数据块;向服务器发送一个接收确认请求(例如发送OK字符串);重复第2步骤,直到收到的数据块类型为下载文件结束时,关闭当前打开的文件,然后退出程序; |
客户端与服务器间所遵循以下下载协议:
1 | 我们定义客户端与服务器间的数据块为16KB(也就是每次传输的数据大小);我们将每个数据块的前1个字节定义为数据块的类型,也就是用于标示该数据块中的内容是文件内容还是下载结束标识,我们使用c标示该数据块为文件内容,e表示下载结束; |
提示:首先客户端向服务器先发送要下载文件的名称,告诉服务器要下载哪个文件;然后服务器读取文件,并发送给客户端。下载文件的客户端实现部分与以上案例中介绍的上传文件服务器端的实现大致相同,请仔细参看以上案例的实现。
文件下载工具的服务器端的核心伪代码如下:
1 | //接收要下载的文件名称 |
1 |
|
select机制是一种很常见的多路复用方法,准许进程指示内核等待多个事件中的任何一个发送,并只在有一个或多个事件发生或经历一段指定的时间后才唤醒。 当调用select()时,由内核根据 IO 状态修改 fd_set 的内容,由此来通知执行了select()的进程的那个 Socket 或文件可读或可写。主要用于 Socket 通信当中。
使用select()可以完成非阻塞(所谓非阻塞方式 non-block ,就是进程或线程执行此函数时不必非要等待事件的发生,一旦执行肯定返回,以返回值的不同来反映函数的执行情况,如果事件发生则与阻塞方式相同,若事件没有发生,则返回一个代码来告知事件未发生,而进程或线程继续执行,所以效率较高)方式工作的程序,它能够监视我们需要监视的文件描述符的变化情况——读写或是异常。
1 | #include <sys/select.h> |
######函数参数 通过传递函数参数告知内核以下三个信息: - 我们所关心的描述符; - 对于每个描述符我们关心的条件(读,写,异常); - 希望等待多长时间(永久等待,等一段时间,不等待)。
函数参数详解如下:
0,1,2...,maxfdp1-1均将被测试。文件描述符是从 0 开始的。struct fd_set可以理解为一个集合,这个集合中存放的是文件描述符,可通过以下四个宏进行设置:1 | void FD_ZERO(fd_set *fdset);//清空集合 |
timeout告知内核等待所指定描述字中的任何一个就绪可花多少时间。其timeval结构用于指定这段时间的秒数和微秒数。1 | struct timeval |
这个参数有三种可能:
永远等待下去:仅在有一个描述字准备好 I/O 时才返回。为此,把该参数设置为空指针 NULL 。
等待一段固定时间:在有一个描述字准备好 I/O 时返回,但是不超过由该参数所指向的 timeval 结构中指定的秒数和微秒数。
根本不等待:检查描述字后立即返回,这称为轮询。为此,该参数必须指向一个 timeval 结构,而且其中的定时器值必须为 0。
select 函数返回,内核告诉我们:
已准备好的描述符数量。
哪个描述符已准备好读、写、或异常。 使用该返回值,就可以调用相应的 I/O 函数(read,write),并且明确知道该函数不会阻塞。
返回值如下:
整个 select 流程如下:
应用示例:
1 | ...... |
本关的编程任务是补全右侧代码片段中Begin至End中间的代码,具体要求如下:
本关涉及的代码文件SelectDamo.c的代码框架如下:
1 |
|
1 |
|